Torta Hawaiana: Pineapple Delight Cake
Craving something sweet? This Torta Hawaiana is a delicious pineapple delight that's perfect for gatherings. Try my tips for the fluffiest texture!

- look into into Torta Hawaiana: A Slice of Pineapple Bliss
- Recipe Overview: A Tropical Tradition
- Key Benefits: More Than Just a Cake
- Essential Ingredients Guide for Your Torta Hawaiana
- Mastering the Art of Professional Cooking: Torta Hawaiana Edition
- look into into Torta Hawaiana: Your Ultimate Tropical Dessert Adventure!
- Recipe Card
look into into Torta Hawaiana: A Slice of Pineapple Bliss
So, let me take you back to a sun-soaked afternoon at my grandma's house. picture this: the scent of sweet pineapple cake filling the kitchen, laughter echoing around as family gathered for a special celebration.
At the heart of it all? her famous torta hawaiana – a delightful treat that brings just the right mix of tropical vibes and comfort.
Honestly, it was love at first bite!
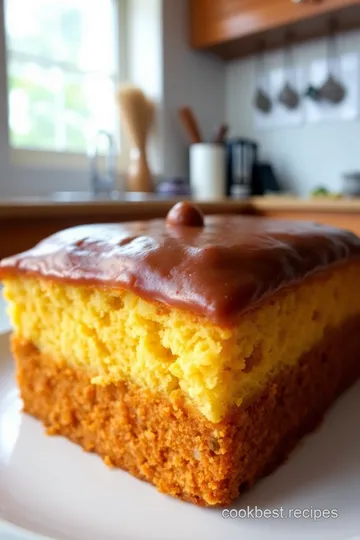
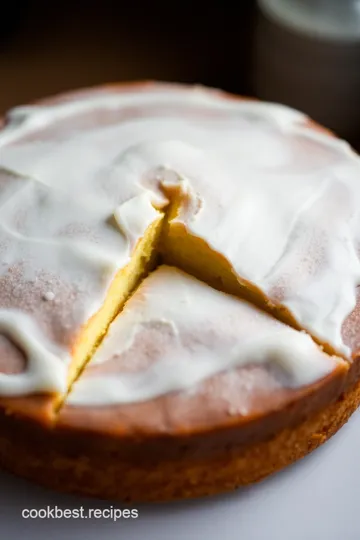
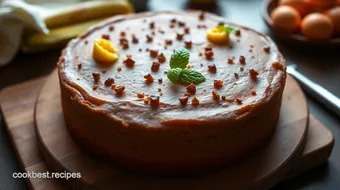
This hawaiian dessert isn't just any cake; it’s a showcase of creamy frosting sitting atop a light and fluffy cake, all decked out with juicy pineapple.
Imagine this vibrant centerpiece sitting pretty on your table for birthdays or just to kick back with coffee on a sunny afternoon.
Trust me, every slice is pure sunshine on a plate!
Recipe Overview: A Tropical Tradition
Let’s take a quick trip down memory lane, shall we? the torta hawaiana has roots in central and south american cuisines.
It was brought to life as folks experimented with tropical fruits, and let’s be real – who wouldn’t want to dive into something so refreshing? these days, this cake is making waves at gatherings and brunches across the u.
S., with its fruity notes winning over hearts and taste buds alike.
Now, about making it – don’t sweat it! this cake is rated medium on the difficulty scale. you’ll spend about 25 minutes prepping and 30 minutes chilling before it bakes for 30 minutes .
The total time from start to enjoy is roughly 1 hour and 25 minutes , but think of it as a breezy culinary adventure.
Plus, it yields 10 generous servings , perfect for sharing (or not!).
And here’s a little secret: while the recipe is packed with ingredients like sugar and cream, you can sneak in some low-fat dessert recipes if you’re watching your waistline. Genius, right?
Key Benefits: More Than Just a Cake
There are plenty of reasons to break out the mixing bowls for this fruity cake recipe . first off, every bite is a gluten-free delight if you swap out regular flour.
Can’t go wrong with that! not to mention, it's a fantastic way to enjoy the health benefits of pineapple, known for its anti-inflammatory properties.
Can i get a high-five for that?
Not only is this cake a hit for birthdays and summer picnics, but it also doubles down as a fantastic chilled dessert on warm days.
Even better? you can get creative with delicious cake toppings like whipped cream frosting or drizzling some coconut milk over it.
Oh, and those fresh mint leaves? they’re not just for show; they elevate the flavor profile for those “wow” moments.
Compared to other tropical fruit desserts , the torta hawaiana stands out thanks to its unique layering and creamy sweetness, plus it's super fun to make.
But let’s be real here – it’s just as much about sharing as it is about enjoying. grab your friends, or do it for you.
Either way, you’ll want to keep a few slices handy!
Ready to make some cake magic? Let’s talk ingredients and get this fiesta going!
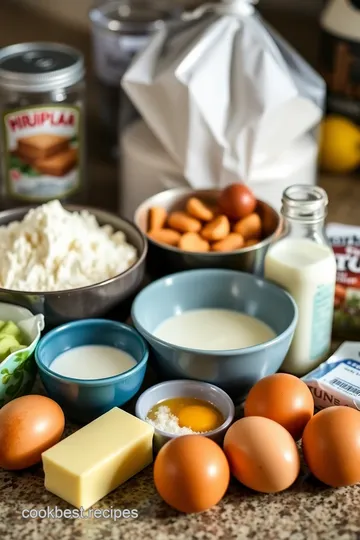
Essential Ingredients Guide for Your Torta Hawaiana
Alright, folks! let’s dive right into the delicious world of torta hawaiana , a tropical-inspired cake that dances on your taste buds.
But before we bake this beauty, it's essential to know some high-quality ingredients that’ll take your cake from “meh” to “wow" in no time!
Premium Core Components for Your Cake
First things first, when you're gathering your ingredients, it's all about quality . You want your cake to be as light and fluffy as a cloud, right?! So here’s the breakdown.
-
All-Purpose Flour : You'll need 2 cups (250g) of this staple. A higher protein content means better gluten formation for that soft texture we’re after.
-
Granulated Sugar : Grab 1 ½ cups (300g) to give your cake that sweet, dreamy flavor. After all, it’s a dessert, not a salad!
-
Butter : Use 1/2 cup (115g) of unsalted butter, softened. You’ll want this to be at room temp to blend in perfectly.
-
Milk : 1 cup (240ml) of whole milk is your ticket to creamy goodness.
-
Eggs : 3 large eggs are non-negotiable. They’re the glue that holds everything together.
-
Baking Powder and Salt : These are your leavening agents. Just 1 tablespoon (15ml) and 1/2 teaspoon (3g) make a big difference.
-
Vanilla Extract : Use 1 teaspoon (5ml) for that warm, inviting scent.
Now, on to those Quality Indicators ! Make sure your flour is fresh and not expired, sugar should be dry and free of clumps, and butter? Always stick with the real deal – no margarine nonsense here!
Storage guidelines and shelf life : keep your flour in a cool, dry place, and butter in the fridge, while eggs can chill out at room temp until you’re ready to use them.
Signature Seasoning Blend
Who doesn’t love a little extra flavor? When you're thinking about sprucing up your Torta Hawaiana , here are some key factors to enhance that taste.
-
Essential Spice Combinations : Try adding a pinch of nutmeg or cinnamon to the cake batter. It can elevate those tropical flavors right up!
-
Herbs and Pairings : Fresh mint leaves ain’t just for garnish, my friends. They add a lovely aromatic twist if you mix them in too.
-
Flavor Enhancers : Go for grated coconut or even a splash of rum to give it that authentic island vibe.
Smart Substitutions
You know how it goes – sometimes you gotta improvise!
-
Common Alternatives : If you don’t have all-purpose flour, you can swap it for cake flour . It'll give you a more delicate cake!
-
Dietary Modifications : Going gluten-free? Use almond flour or a gluten-free blend.
-
Emergency Replacements : No heavy cream? No problem! Whip up Greek yogurt or even coconut cream for that yummy, creamy frosting.
Kitchen Equipment Essentials
Alright, let’s get into your tools! You can’t just wing it; having the right equipment makes all the difference.
-
Must-Have Tools : A good electric mixer is a lifesaver. Trust me, your arms will thank you!
-
Alternative Equipment Options : In a bind, a whisk works too, but be prepared for a little workout!
-
Preparation Tips : Always grease and flour your pan to avoid a sticky situation with your cake.
-
Storage Solutions : Wrap leftover cake tightly in plastic, or pop it in an airtight container so it doesn’t dry out.
So there you have it, the must-knows to whip up a rocking torta hawaiana in your own kitchen! next up, we're diving into the step-by-step instructions on how to actually make this slice of tropical heaven.
Trust me, your taste buds will thank you! keep those aprons on, and let's bake!
Mastering the Art of Professional Cooking: Torta Hawaiana Edition
When it comes to whipping up a masterpiece like torta hawaiana , aka that dreamy hawaiian cake, there are some professional cooking methods you’ll want to keep in your back pocket.
This isn’t just your run-of-the-mill cake; we’re talking about a tropical dessert that’s light, fluffy, and bursting with flavor—perfect for summer gatherings, birthdays, or a spontaneous treat.
So grab your apron, and let’s dive into the secret world of pro baking!
Essential Preparation Steps
Before we dive in, let’s talk about the essentials. mise en place - fancy words for “everything in its place.
” seriously, measure out your ingredients beforehand like a pro. it saves time and your sanity. grab bowls and spoons, and get everything lined up for your pineapple cake recipe .
Time management tips? oh, absolutely! while your cake is baking (that glorious 30 minutes in a sizzling oven at 350° f ), you can whip up the frosting.
Dividing tasks helps keep things smooth, ya know?
Staying organized is key. make sure your workspace is tidy. a clean kitchen is a happy kitchen. trust me; it helps you focus on that festive cake recipe you’re creating, not the mess surrounding it.
Lastly, let’s not forget about safety! watch your hands and keep those oven mitts handy. be aware of hot surfaces and remember that a little care goes a long way in the kitchen.
Step-by-Step Process
Alright, let’s break this down. Here’s how you can nail that Torta Hawaiana from start to finish with effortless flair:
- Preheat your oven to 350° F ( 175° C) .
- Grease and flour your 9x13 inch pan . Seriously, don’t skip this step!
- Whisk together 2 cups of flour, 1 tablespoon of baking powder, and ½ teaspoon of salt in one bowl.
- In a larger bowl, cream ½ cup of softened butter and 1 ½ cups of sugar until it’s fluffy. Think clouds.
- Add 3 eggs one by one , mixing well, then pour in 1 cup of milk and 1 teaspoon of vanilla . Mix until combined.
- Slowly stir in your dry mix into the wet mix until just barely combined. Less mixing = a lighter cake!
- Pour that batter lovingly into the pan. Then, pop it in the oven for 30 minutes or until a toothpick comes out clean.
- Cool it in the pan for 10 minutes , then transfer it to a rack.
Now, take a breather while the cake cools. It’s like the calm before the tropical storm of flavors!
Expert Techniques
Time to level up! Let’s bring in those expert techniques . The key here is timing and temperature:
- Check for doneness around the 28-minute mark . Keep an eye out for a golden color and a springy touch. Don’t just set a timer; use your eyes!
- When you whip the cream, make sure that bowl is chilled; it does wonders! It gives your whipped cream frosting that sturdy hold without deflating like a sad balloon.
Think of quality checkpoints, too. Taste the frosting before slathering it on. If it’s sweet enough but not overwhelming, you’re golden!
Success Strategies
Now, let’s get real about those success strategies . we all mess up from time to time, right? avoid common mistakes like over-mixing the batter, which can lead to a dense, yucky cake.
Nobody wants that.
For quality assurance, remember: let your cake rest in the fridge after you frost it. chilling for 30 minutes helps those flavors marry and makes it easier to slice.
Plus, it just looks fancy!
And if you’re looking for ways to prep ahead? you can bake the cake a day early. just cover it well to keep that freshness.
You’ll be the superhero of easy cake recipes!
Wrapping It Up
And there you have it—a homemade torta hawaiana that’s sure to wow anyone you serve it to. don’t let the process intimidate you; remember that practice makes perfect! plus, with tips to enhance flavor like adding coconut or using fresh fruit as a topping, you can always keep it interesting.
Feeling inspired? great! next, let’s get into the additional information about variations, substitutes, and how to elevate your cake game even further.
Trust me, once you’ve tried this fluffy delight, you'll keep coming back for more tropical flavors and those sweet, sweet vibes! happy baking, friends!
look into into Torta Hawaiana: Your Ultimate Tropical Dessert Adventure!
Oh my gosh, folks! if you’re ready to take your taste buds on a tropical vacation, you absolutely need to check out this torta hawaiana .
Think of it as a hawaiian dessert superstar — a lovely pineapple cake recipe that’ll make you feel like you're lounging on a beach, sipping a fruity drink.
Seriously, this sweet pineapple cake is the perfect way to bring sunshine into your kitchen, especially as summer rolls around!
Pro Tips & Secrets
Let’s kick things off with some pro tips that’ll help you nail this cake like a seasoned chef. Trust me, it’s all about those little secrets.
-
Time-Saving Techniques: If you’re short on time, use a store-bought whipped frosting. It'll save you some serious minutes when throwing this cake together. Just make sure it's creamy !
-
Flavor Enhancements: Want to take your cake to the next level? Add a splash of coconut milk in the batter. It’ll give your Torta Hawaiana a delightful tropical kick.
-
Presentation advice: when it comes to making this cake a feast for the eyes, don’t underestimate the power of garnishing with fresh mint.
It adds a pop of color and a fresh vibe!
Perfect Presentation
You know what they say: you eat with your eyes first! Plating this cake properly can make a world of difference.
-
Plating Techniques: Use a large, colorful plate to contrast against the light and fluffy cake.
-
Garnish Ideas: Fresh mint leaves or even some edible flowers make the dish pop. Plus, they bring a bit of elegance to your typical backyard BBQ!
-
Color Combinations: The golden pineapple against the creamy frosting and mint leaves creates a gorgeous tropical look.
-
Visual Appeal Tips: If you're feeling feisty, try layering the cake with additional fresh fruit toppings like kiwi or strawberries to enhance those tropical vibes.
Storage & Make-Ahead
You can totally make this cake ahead of time!
-
Storage Guidelines: Cover the Torta Hawaiana with plastic wrap in the fridge. It’ll keep fresh for about 3 days.
-
Preservation Methods: Make sure to store it in an airtight container to avoid any moisture getting in—nobody likes a soggy cake!
-
Reheating Instructions: This cake is best enjoyed cold. But if you’re craving a warm treat, just pop it in the microwave for about 10 seconds, but be careful not to melt the frosting!
-
Freshness Duration: You know, I recommend eating leftovers within a week if you want it to taste its best.
Creative Variations
Feeling adventurous? Here are some fun variations to try.
-
Flavor Adaptations: Swap out the crushed pineapple for other tropical fruits like mango or passion fruit. Talk about a fruity cake recipe that’ll wow your friends!
-
Seasonal Twists: Add pumpkin spice in the fall, or even use fresh berries in the summer for a seasonal twist.
-
Dietary Modifications: You can easily make this cake gluten-free by substituting with your favorite gluten-free blend and also use low-fat alternatives in the frosting.
Complete Nutrition Guide
I know, I know. We’re here for cake, but it’s good to know what you're eating!
-
Detailed Breakdown: A slice of this Torta Hawaiana typically has around 290 calories. Not too bad for a slice of joy, right?
-
Health Benefits: Pineapple is full of vitamins and antioxidants. Plus, when you pair it with whipped cream frosting , you just enjoy the indulgence guilt-free!
-
Dietary Considerations: Keep in mind the calories from the frosting. If you want a slightly lighter option, opt for a fresh fruit topping instead.
Expert FAQ Solutions
Here’s where I tackle some common questions and might ease your baking worries.
-
Common Questions: “Why did my cake sink?” This happens when the oven door is opened too soon or overmixing the batter.
-
Troubleshooting Guide: If your cake is too dense, your eggs might’ve been too cold or not properly creamed with the butter.
-
Success Tips: Make sure to let your cake completely cool before frosting it. Warm cake and frosting just do not mix!
In closing, the torta hawaiana is more than just a cake. it’s an experience! so, whether it’s for a birthday, a summer barbecue, or just because, dive into this tropical delight and let it transport you straight to the islands.
Happy baking, friends! 🍍
Torta Hawaiana: Pineapple Delight Cake Card
⚖️ Ingredients:
- 2 cups (250g) all-purpose flour
- 1 ½ cups (300g) granulated sugar
- 1/2 cup (115g) unsalted butter, softened
- 1 cup (240ml) whole milk
- 3 large eggs
- 1 tablespoon (15ml) baking powder
- 1 teaspoon (5g) vanilla extract
- 1/2 teaspoon (3g) salt
- 1 cup (240ml) heavy cream
- 1 cup (120g) powdered sugar
- 1 teaspoon (5ml) vanilla extract
- 1 can (15oz / 425g) crushed pineapple, drained
- Fresh mint leaves for garnish (optional)
🥄 Instructions:
- Step 1: Preheat the oven to 350°F (175°C).
- Step 2: Prepare the pan by greasing and flouring the baking dish.
- Step 3: In a bowl, whisk together the flour, baking powder, and salt.
- Step 4: In a large bowl, beat the softened butter and granulated sugar until light and fluffy.
- Step 5: Mix in the eggs one at a time, then add the milk and vanilla extract; beat until combined.
- Step 6: Gradually add the dry ingredients into the wet mixture, stirring until smooth.
- Step 7: Transfer the cake batter evenly into the prepared pan and smooth the top.
- Step 8: Bake for 30 minutes or until a toothpick comes out clean.
- Step 9: Remove from the oven and let it cool in the pan for 10 minutes before transferring to a cooling rack.
- Step 10: In a bowl, whip the heavy cream until soft peaks form; gradually add powdered sugar and vanilla, continuing to whip until stiff peaks form.
- Step 11: Spread the whipped cream frosting evenly over the cooled cake.
- Step 12: Evenly distribute the drained crushed pineapple over the frosting.
- Step 13: Refrigerate for at least 30 minutes before serving.
- Step 14: Optional - add fresh mint leaves before slicing and serving.
Previous Recipe: How My Grandmother’s Healing Beef Tea Became a Family Favorite
Next Recipe: How to Enjoy Hot Banana Pepper Plant: 5 Delicious Stuffed Ideas!