DIY Herbal Liqueur Recipe
Wondering how to craft your own delightful herbal liqueur? Dive into my cozy kitchen experience and learn how to create your unique liqueur liqueur with fresh herbs!

Homemade Herbal Liqueur: A Flavorful Infusion
Oh my gosh, have you ever taken a sip of something that just instantly transported you to a lush garden? that’s exactly how i felt the first time i tried a homemade herbal liqueur at a friend’s dinner party.
I was completely blown away! the way they described how they crafted their own liqueur liqueur —using a mix of herbs and a little patience—got my wheels turning.
I knew right then that i had to give it a shot myself.
Recipe Overview: A Little Backstory
Herbal liqueurs have been around for centuries, often stemming from european traditions where folks would make sweetened herbal drinks for medicinal purposes.
Today, they’re enjoying a comeback and are a fan favorite at parties and in cozy cocktails. you won’t believe how straightforward it is to whip up your own batch! seriously, it’s like a kitchen experiment anyone can be a part of.
It does take some time—like 1 to 2 weeks for steeping—but the hands-on part only takes about 20 minutes.
And let's talk about cost. You’re looking at spending around $15 to $20. Considering this recipe makes about 750 ml of liqueur, that’s about 10 servings of delightful goodness! Perfect for your next gathering or just to treat yourself, you know?
Key Benefits: Why You’ll Love Making This
Now, let’s get into why making your own herbal liqueur is such a great idea. first off, health-wise, you control what goes in! you get to use high-quality ingredients and avoid those funky additives often found in store-bought brands.
Plus, who doesn’t love the idea of sipping on botanical liqueurs that you made yourself? it’s honestly like giving yourself a high-five!
This recipe shines at special occasions too. think about holiday gatherings or backyard barbecues—this herbal liqueur is the ultimate conversation starter! you can serve it chilled, pour it over ice, or mix it with some soda for a refreshing cocktail.
The liqueur making techniques you'll learn will inspire you to experiment more in the kitchen, making diy liqueur a fun new hobby.
One key advantage here is flexibility; you can customize the flavors! want a little twist of citrus? toss in some orange zest! feeling adventurous? let’s get some berries in there for those berry-infused liqueurs that’ll be the talk of the summer.
You can truly make this your own.
Getting Ready to Mix
So, now that you're all fired up about crafting your own herbal liqueur, let’s chat about the ingredients you’ll need.
Grab some vodka (or another neutral spirit) and your favorite herbs. fresh mint, rosemary, and basil are fantastic choices; let your taste buds guide you!
Don’t forget, the infusion time for flavors is crucial for achieving that perfect balance. you’ll have a chance to fine-tune it to your liking.
Plus, when you’re straining out those herbs, the sight and aroma will make you feel like a culinary wizard .
Next up, we’ll dive into those ingredients and get you on the path to creating your very own herbal liqueur .
Trust me, it’s going to be an adventure that ends in a delicious reward!
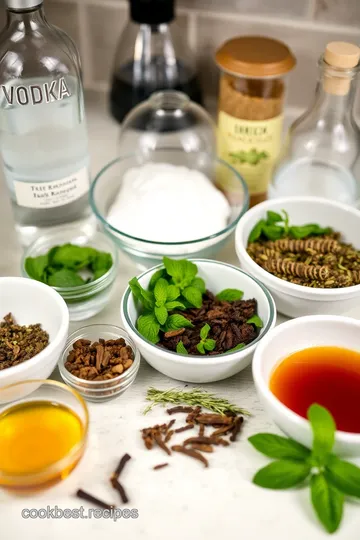
Essential Ingredients Guide
When you're diving into the world of crafting homemade liqueurs, it's all about the essentials . and trust me, having the right premium core components can make or break your infusion game.
Let's break it down like we’re chatting over a coffee on a lazy sunday.
Premium Core Components
First things first, let's talk measurements . for most recipes, you’re looking at around 2 cups (500 ml) of vodka—that’s your base.
If you're measuring out sugar, it's a cup (250 ml) for that perfect balance. don't stress too much about the metric stuff; just think of it as a gentle reminder that everyone can play this game!
Now, when it comes to checking the quality indicators for your ingredients, always go for the good stuff. use a smooth vodka for a cleaner taste—trust me, you’ll thank me later.
For herbs, fresh is best, but dried works in a pinch too. oh, and if those mint leaves have lost their green charm, throw 'em away!
Storage guidelines and shelf life are also key players in this liqueur saga. keep your concoctions in a cool, dark place.
Whether you’re using an airtight mason jar or a fancy bottle, the darker the storage spot, the better! as for shelf life, homemade liqueurs can last several months if stored right—maybe even longer.
But remember, the fresher, the better!
Now let’s get specific with some freshness tips . choose vibrant herbs and spices—you want them to pop! if you’re picking fresh mint, look for those luscious green leaves that smell like a spring garden.
The scents are usually a good indicator of quality.
Signature Seasoning Blend
Ah, the heart of every great liqueur: the signature seasoning blend! I'm telling you, mixing spices is like being a magician in the kitchen. You’ve got to strike that perfect balance.
A classic combo would be dried mint, rosemary, and basil. each gives its unique twist to the flavor, transforming a regular drink into something magical.
Ever thought about herb selections ? try experimenting with some local favorites too! remember that regional variations can lead to some exceptional finds.
Think of hinting at a southern charm with a touch of peach, or a bit of new england with cranberry.
Flavor enhancers are your best buddies. like a dash of vanilla extract or a pinch of nutmeg—these little guys elevate your liqueur to superstar status.
And for the adventurous spirits, try adding some aromatic herbal infusions !
Smart Substitutions
Ever find yourself in a pinch? don’t stress too much. there’s always room for smart substitutions in the liqueur world.
If you realize you’re out of vodka? use gin! or rum, if that vibes more with your style.
Feeling more experimental? there are plenty of common alternatives . for sweeteners, honey, agave syrup, or even maple syrup can jazz things up a bit.
Thinking about seasonal options? use oranges or apples when they’re in season for that seasonal flare.
And don’t forget, the whole point of crafting your own liqueur is personalization. mix it up and adjust based on what you love.
After all, this is about making an infused spirit that speaks to you!
Kitchen Equipment Essentials
Let’s talk tools. you gotta grab some essential equipment. a mason jar? total must-have. this will be your home while your flavors mingle.
Plus, get your hands on a fine mesh strainer or cheesecloth for the magic part—when you strain out those herbs.
Need a funnel? absolutely. i can’t tell you how many times i’ve had a messy countertop because i tried pouring liqueur into the bottle without one.
And before you know it, i’m cleaning up a sticky situation!
When you’re preparing your DIY liqueur, having a plan for storage solutions is key. Make sure your bottle is properly sanitized and labeled—trust me, no one wants to accidentally drink a spicy herbal concoction expecting sweet berries!
So, now that we’ve got the nitty-gritty down, let’s dive into that homemade liqueur recipe where all this knowledge comes together.
You're going to love creating something that’s not just delicious, but brings joy to your gatherings. cheers to flavor-infused adventures ahead!
Professional Cooking Method: Crafting Your Own Herbal Liqueur
So, you wanna dive into the world of professional cooking, huh? well, let’s focus on something super fun and addictive: making homemade herbal liqueur ! it may sound fancy, but don’t sweat it.
I promise you can totally pull it off. let's break it down into simple steps, almost like a kitchen adventure!
Essential Preparation Steps
First off, let's talk about mise en place . you’ve probably seen chefs on tv saying that. basically, it means, “get your stuff together before you start.
” measure out your 2 cups of vodka , 1 cup of sugar , and 1 cup of water . gather your herbs too: dried mint, rosemary, and basil—those fragrant beauties will give your liqueur that extra oomph!
Now, time management is key! you might need 1-2 weeks for steeping, so plan ahead. your liqueur’s not going to rush into existence.
It'll be soaking up those flavors while you go about your life. just make sure to give it a good shake every few days.
Organization? oh, it’s a lifesaver. keep your workspace tidy and have all your ingredients close by. here’s a safety tip: make sure to use a clean bottle for storage.
We don't want any funky bacteria crashing your liqueur party!
Step-by-Step Process
-
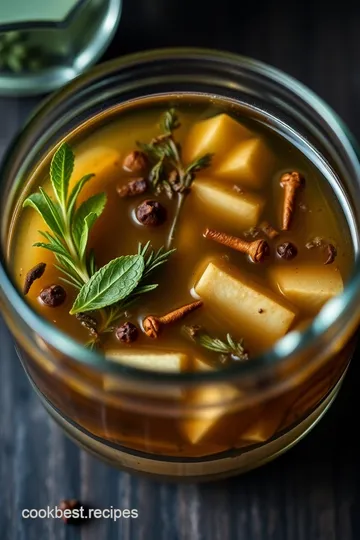
Prepare the Infusion : Grab a mason jar and mix that wonderful vodka , herbs, and any optional spices. Shake it like you’re at a party!
-
Steep the Mixture : Store it in a cool, dark spot for 1-2 weeks . This is chill time, you know? Let those flavors mingle and flirt.
-
Prepare the Simple Syrup : Heat 1 cup of sugar and 1 cup of water in a saucepan until the sugar dissolves. Easy peasy, huh? Let it cool off once you're done.
-
Strain the Infusion : After steeping, use a fine mesh strainer to get rid of the herbs. Voila! Liquid gold!
-
Combine and finish : mix that sweet simple syrup with your strained infusion. go ahead and taste-test! if it’s not sweet enough, add more syrup.
Oh, and don't forget a dash of lemon zest for a pop of brightness.
-
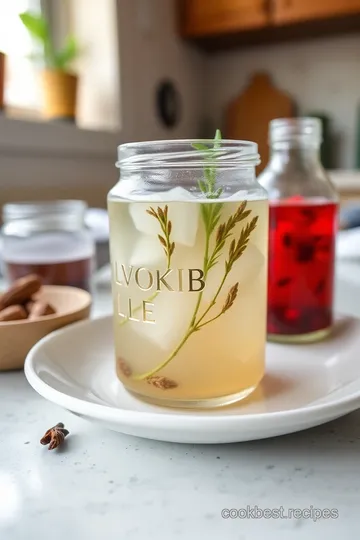
Bottle the Liqueur : Pour it all into a clean bottle. Pat yourself on the back, you’re almost there!
-
Enjoy : Serve it chilled or over ice. Trust me, your friends will think you’re some gourmet genius!
Expert Techniques
Okay, let’s talk about expert-level stuff. the key here is temperature control . if you’re making this in the summer, keep that infusion away from heat.
You don’t want those herbs to get all funky. as for timing, don’t rush the steeping! longer infusion means bolder flavors—think of the herbal liqueurs that linger on your palate.
For quality checkpoints, taste test the infusion every few days. ask yourself— is it bold enough? does it need more sweetness? and if something goes sideways, no worries! just adjust as needed or add lemon zest to brighten it up.
Success Strategies
Let’s avoid the drama of common mistakes, shall we? remember, don’t skip on quality ingredients. a cheap vodka will leave your liqueur tasting like regret.
Also, don’t freak out if it doesn’t taste perfect at first; you can always tweak it later.
Want assurance of quality? if you're feeling bold, try experimenting with berry-infused liqueurs or even citrus-infused spirits . change it up! check in on the flavor infusion methods you use and always be curious.
Oh! and did i mention make-ahead options ? this liqueur is perfect for parties. prepare it in advance, store it properly, and you’ll be the life of the gathering.
It’s all about crafting liqueur at home that keeps friends coming back for more.
All in all, this process is about having fun. Your homemade herbal drinks can kick up any cocktail game. Ready to take the plunge and whip up those spiced herbal concoctions ? Let’s keep crafting those botanical liqueurs together!
Additional Information…
It takes a little patience to make something great, just like good friendships. and remember, cooking is about experimenting—don’t be scared to add your twist to traditional liqueur recipes.
Whether you opt for diy herbal liqueur or venture into more complex infusions, i expect to see you rocking those flavor balances.
Cheers to your new skills!
Additional Recipe Information for Homemade Herbal Liqueur
So you’re diving into the world of diy herbal liqueur ? awesome choice! making liqueurs at home can be super rewarding, and guess what? you can totally personalize it to fit your vibe.
Let’s get into some pro tips, pretty presentations, handy storage tricks, fun variations, and a nutrition guide to help you on this liqueur adventure!
Pro Tips & Secrets
First up, let’s chat about some insider tips . use high-quality vodka for your base. it makes a world of difference.
Trust me! to save time, you don’t have to let it steep for a full two weeks. if you’re in a pinch, a week can still yield a decent flavor, though longer is usually better.
When it comes to flavor enhancement, don’t be shy about using aromatic herbal infusions . taste-test your mixture every couple of days.
It’s like a surprise party for your taste buds! if you want a little extra sweetness, adjust your simple syrup until you've hit that perfect balance.
And for presentation? consider using fun glasses. your guests will notice and appreciate your effort.
Perfect Presentation
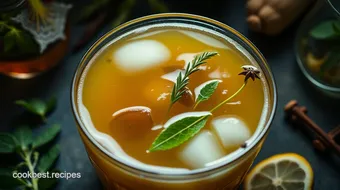
Now, let’s talk presentation . plating is key! you can serve your liqueur over ice in a beautiful glass with a twist of lemon or some fresh herbs popping out.
This isn’t just a drink; it’s a conversation starter. think about the colors! pair vibrant herbs with the golden tones of your liqueur.
As for garnishes, think citrus zest or fresh herbs . a sprig of mint hanging on the edge of the glass? total showstopper.
And if you’re crafting cocktails, use unique cocktail mixers —like your homemade liqueur—to elevate the ordinary to extraordinary.
Storage & Make-Ahead
Okay, so how do you keep your homemade herbal drinks in tip-top shape? first, keep your liqueur in a cool, dark spot —this will help preserve those lovely flavors.
Aim to use your homemade herbal liqueur within about 6 months for the best taste, especially if you’re experimenting with fresh ingredients.
When it comes to reheating, not relevant here, but you can chill it down in your fridge for an extra refreshing sip, especially in summer.
And if you've got leftovers? don't panic! just funnel it back into a clean bottle for later use.
Creative Variations
Let’s spice things up! there are so many ways to play with this recipe. try out some seasonal twists : add some citrus-infused spirits in the spring, or maybe dabble in berry-infused liqueurs during summer.
Don’t be afraid to explore different flavor infusion methods !
If you lean toward a specific diet, like vegan or keto, tweak the sweeteners— alternative sweeteners like agave syrup can work wonders.
Complete Nutrition Guide
Alright, time for the not-so-fun, but oh-so-necessary stuff: nutrition . this herbal liqueur packs about 120 calories per serving. not too shabby! with zero protein and fat, it’s mostly those yummy carbohydrates from sugar.
If you’re keeping an eye on sugar intake, remember that you control the sweetness. adjust as necessary!
Expert FAQ Solutions
Common questions? no problem. a popular one is, “can i use dried herbs in drinks ?” absolutely! they work well too, especially if fresh ones aren’t available.
Another frequent concern is how to fix a liqueur if it’s too bitter. just add a little more simple syrup or water to balance things out.
And don’t stress if your infusion color doesn’t look like what you imagined. It can vary quite a bit based on the herbs you use, so just roll with it!
Conclusion
Making your own herbal liqueur is such a fun, creative cooking project. it might seem a bit tricky at first, but don’t get overwhelmed! you’ll learn so much along the way.
Just get your hands a little messy, enjoy the process, and wow your friends with your new skills and awesome flavors.
Whether you’re sipping solo or mixing up some fresh herb cocktails with your unique drinks, it’s all about enjoying the experience.
So go ahead, grab those herbs, and start crafting your delicious herbal liqueur! cheers!
DIY Herbal Liqueur Recipe Card
⚖️ Ingredients:
- 2 cups (500 ml) vodka
- 1 cup (250 ml) granulated sugar
- 1 cup (250 ml) water
- 2 tablespoons dried mint leaves
- 2 tablespoons dried rosemary
- 2 tablespoons dried basil
- Optional: 1-2 cloves
- Optional: 1 small cinnamon stick
- 1-2 tablespoons fresh lemon zest (optional)
🥄 Instructions:
- Step 1: Combine the vodka, dried herbs, and optional spices in the mason jar. Seal tightly and shake gently to mix.
- Step 2: Place in a cool, dark spot to steep for 1-2 weeks. Shake the jar gently every few days to mix flavors.
- Step 3: In a small saucepan, combine sugar and water. Heat over medium heat, stirring, until the sugar fully dissolves. Allow it to cool.
- Step 4: After steeping, use a fine mesh strainer or cheesecloth to strain the herbal mixture into a clean container.
- Step 5: Add the simple syrup to the strained infusion, stirring to combine. Taste and adjust sweetness as desired. Optionally, stir in lemon zest.
- Step 6: Use a funnel to pour the liqueur into a clean bottle for storage.
- Step 7: Serve chilled, over ice, or as part of a cocktail.
Previous Recipe: How to Make My Grandmother's Sauce Piquant: A Zesty Delight!
Next Recipe: How to Make Delicious Taglierini: My Grandma's Secret Recipe