Black Russian Bagel: The Ultimate Guide to Chewy Perfection
Discover the delightful Black Russian Bagel – a chewy twist on the classic! Perfect for breakfast or brunch with my top tips included!

- Get Ready to Get Chewy: A Personal Take on Black Russian Bagels
- A Little Background on the Bagel
- Why You Should look into Into This Recipe
- A Few Tips for Mastering Your Bagel Game
- Your Go-To Essential Ingredients Guide for the Perfect Black Russian Bagel
- Black Russian Bagel: A Chewy Delight Awaits
- Whipping Up the Perfect Black Russian Bagel: Tips & Secrets for Your Kitchen Adventure!
- Frequently Asked Questions
- Recipe Card
Get Ready to Get Chewy: A Personal Take on Black Russian Bagels
You ever have one of those mornings where you really just need something special? a little pick-me-up? well, that’s where my love for the black russian bagel comes in, and let me tell you, this bagel is like a warm hug for your taste buds.
When i first tried making these chewy little beauties, the combination of coffee-infused dough with a hint of cocoa had me wondering why i hadn’t given this a shot sooner.
Because really, who wouldn’t want to start their day with a bagel that’s both sweet and savory?
A Little Background on the Bagel
So, what’s the story with the black russian bagel ? these bad boys trace their roots back to eastern europe, where bagels have been a staple for ages.
They’re a fun twist on the traditional bagel that had to evolve to keep up with the times. in today’s world, these calorie-dense delights have surged in popularity.
They're perfect served fresh out of the oven or as a base for a killer breakfast sandwich.
Now, if you’re thinking about making these at home, you’ll need to set aside around 1 hour and 10 minutes .
I know, it sounds like a commitment, but don’t worry. the time flies by, especially when you get in the zone of kneading the dough .
Honestly, it’s like a mini workout. and guess what? they yield a solid eight bagels to share—or not! your call.
Why You Should look into Into This Recipe
Let’s talk benefits . sure, a bagel might not scream “health food,” but trust me, these babies aren't just about a tasty crunch.
The black russian bagel stands out as a nutritious option, especially since it can be made with whole grain flour and is loaded with protein.
Pair this with some cream cheese or grab some avocado slices , and you have a bright start to your day.
These little gems aren’t just for breakfast, though; they shine at brunch or even as a lovely sandwich base for lunch.
I’ve whipped up variations with sweet and savory toppings—think homemade jams or the classic smoked salmon. it’s like giving your whole meal a gourmet touch!
A Few Tips for Mastering Your Bagel Game
Before we get to the ingredients (and let’s be real, the best part), let me share some handy bagel-making tips.
First off, proofing yeast is key! always check your water temperature, too cold and nothing happens, too hot and it’s game over for your yeast.
And don’t skip the boiling step —this is what gives your bagels that iconic chewy crust texture that makes you go, “oh wow!”
If you’re into experimenting, why not try adding some unique flavors to your bagel? i’ve tossed in spices like garlic or even chopped olives for a savory twist.
The options are as endless as your cravings! just think about the delightful combos you could have with a gourmet bagel recipe !
Alright, before i get too carried away reminiscing about my experiences with these bagels (seriously, it’s a love story in the making), let’s check out the ingredients you’ll need to bring this delicious black russian bagel recipe to life.
Trust me; your taste buds will thank you!
Your Go-To Essential Ingredients Guide for the Perfect Black Russian Bagel
Alright, friends. if you’re diving into the amazing world of bagel-making, buckle up because we’re about to turn things up a notch with the black russian bagel .
Think deeply chewy, enticingly rich, and a little bit fancy — and don’t worry; we’ll break it down step by step!
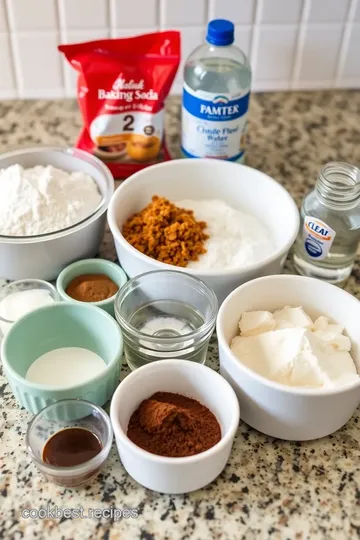
Premium Core Components
First up, let’s talk ingredients. Here are the key components to stock your pantry.
-
Bread Flour : You need 4 cups (500g) for that chewy texture. If you use all-purpose flour, your bagels won’t have the same bite. Trust me on this one!
-
Cocoa Powder : A big tablespoon (15g) gives the bagels that chocolatey hint without overpowering.
-
Instant Yeast : You want 1 tablespoon (15g) to help your dough rise like a pro. It's a magical ingredient — without it, your bagel game is over.
-
Brewed Coffee : Use 2 tablespoons (30ml) of this to give your bagels a subtle coffee kick. Seriously, it’s like your morning cup of Joe meets your favorite breakfast carb!
Tip : Store your ingredients wisely. Keep the flour in an airtight container in a cool place. Check the expiration dates on your yeast, too. Freshness is key!
Signature Seasoning Blend
Now let’s add some flair. The right seasonings can elevate your Black Russian Bagel recipe from "meh" to "wow!"
-
Salt : It’s a must for flavor balance. Use 1 teaspoon (5g) .
-
Sugar : A tiny touch, just 1 tablespoon (15g) , will work wonders. It helps activate the yeast and caramelizes during baking.
-
Optional Toppings : Get creative, friends! Try coarse sea salt or everything bagel seasoning for an extra crunch.
When you boil your bagels, add 1 tablespoon (15g) baking soda to the water. This step is essential for that shiny, bagel crust texture we all love.
Smart Substitutions
Not all of us have every ingredient on hand, and that’s okay! Here’s how to swap things out without losing flavor:
-
If you're low on bread flour , you can mix in some all-purpose flour but keep it at ¾ cup for every 1 cup of bread flour.
-
No cocoa powder? No problem! Try using carob powder for a milder taste.
-
Short on yeast? if you're really in a pinch, you can use active dry yeast , but be sure to proof it first! just mix it with warm water and a pinch of sugar until foamy.
Kitchen Equipment Essentials
Let’s make bagel creation a breeze. Here’s what you need:
-
Mixing Bowl : A sturdy one for mixing your dough.
-
Dough Scraper : Super handy for handling sticky dough.
-
Baking Sheet : Lined with parchment paper, of course!
-
Large Pot : For boiling. This is where the magic happens, making sure that perfect chewiness.
-
Slotted Spoon : For gently retrieving those boiling beauties.
Remember to chill your bagels for 30 minutes after shaping them. This is part of the bagel chilling process and helps them hold shape during the boil!
Final Note on Equipment : If you don’t have a baking scale, no worries! You can still use volume measurements; just make sure to pack your flour lightly when using cups.
Transitioning to the Recipe
Now that you're stocked up, prepped, and ready, let’s roll up our sleeves and dive into making those luscious black russian bagels ! with a bit of patience and these bagel-making tips , you’ll impress your friends and family with your homemade bagels.
Grab your coffee (you might need it!), and let’s get to baking while we chat about all things boils and crusts!
Perfect chewy bagels are just a few steps away, and I promise you, it’s worth the effort. Whether you slather them with cream cheese or use them as a sandwich base, you’re in for a treat!
Ready? Let's bake!
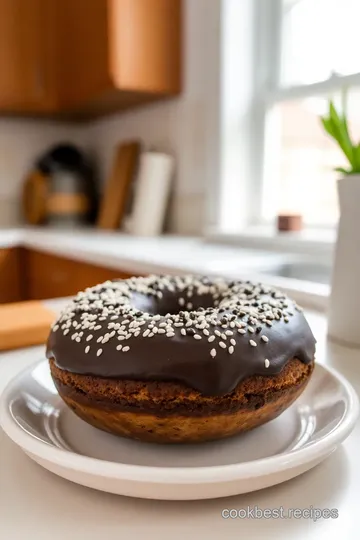
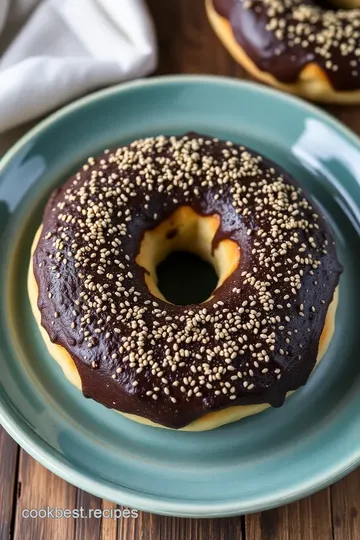
Black Russian Bagel: A Chewy Delight Awaits
Alright, folks, let’s dive into something truly special—the black russian bagel . this isn’t just any bagel; we’re talking chewy, coffee-infused, and with a hint of cocoa to boot! if you've ever wanted to elevate your bagel game and impress your brunch buddies, this is the recipe for you.
And hey, bagels aren’t just for breakfast. think bagel sandwiches that’ll make you the kitchen hero!
Essential Preparation Steps
Before we get our hands dirty, let’s chat about some essential prep. first up, you’ll want to get into the mise en place mindset.
That fancy french term just means having everything prepped and in place before you start cooking. trust me, it’ll save you from mad dashes across the kitchen.
Time management is also crucial. set aside about 15 minutes to prep and 30 minutes for chilling, then let’s boil those babies and bake them for about 25 minutes .
Keep a timer handy!
Stay organized! keep your tools and ingredients tidy. it’ll make everything smoother, i promise. and safety? don’t forget to keep surfaces clean, and use a thermometer for that warm water—ideally around 110° f ( 43° c) to help activate our yeast.
Step-by-Step Process
Let’s break it down step-by-step so you can nail that Black Russian Bagel recipe without a hitch!
-
Make the dough : combine warm water (that’s 110° f/ 43° c again), instant yeast, and sugar in a bowl.
Let it sit for 5 minutes until foamy. then slowly add in 4 cups of bread flour , 2 tablespoons of cocoa powder , and 1 teaspoon of salt .
Mix it up!
-
Knead Away : Bring in the coffee— 2 tablespoons of brewed coffee —and knead your dough for about 10 minutes until smooth. Bless your arms!
-
Time to Rise : Put that dough in a greased bowl, cover it, and let it rise in a warm spot for about 1 hour , or until it’s doubled in size.
-
Shape It Up : Divide the dough into 8 pieces, roll them into balls, poke a hole in each one, and stretch them into a bagel shape.
-
Chill Out : Pop those shaped bagels on a baking sheet for about 30 minutes in the fridge. This helps them hold their shape.
-
Boil & bake : boil water in a large pot with 1 tablespoon of baking soda and 1 tablespoon of malt syrup .
Boil each bagel for 1- 2 minutes on each side. then, transfer them back to the sheet. preheat your oven to 425° f ( 220° c) and bake for 20- 25 minutes until they’re golden brown.
-
Cool Down : Let them cool on a wire rack for about 10 minutes before diving in.
Expert Techniques for Bagel Perfection
Now that you’ve got the basics down, let's add in some expert techniques.
-
Knead Thoroughly : It’s key for that perfect chewy bagel texture. So don’t rush!
-
Boil Your Bagels : This isn’t optional—boiling creates that fabulous crust. It’s like a magic trick!
-
Check for Doneness : A perfectly baked bagel will be a deep golden brown.
-
Quality Checkpoints : If your dough isn’t rising, check the temperature of the water. Too hot or cold, and you’ve got sick yeast.
Success Strategies for Bagel Making
So we’ve talked about the process, but what about avoiding disaster? Here are my golden nuggets:
-
Common Mistakes : Don’t skip the chilling process. It’s essential for texture!
-
Quality Assurance : Use bread flour instead of all-purpose for that chewy, artisan feel.
-
Make-ahead Options : Shape your bagels the night before and boil them the next day. It’s a total lifesaver!
Now, you’re ready to conquer the world of homemade bagels . imagine slathering cream cheese on a warm black russian bagel topped with smoked salmon.
Perfect, right? from breakfast bagels to the ultimate sandwich base, your kitchen game just leveled up!
Before we wrap up, for those curious about the nuances and cultural significance of bagels, stick around for some additional information about regional bagel styles and serving suggestions.
I promise it’ll make you appreciate your chewy creations even more!
Whipping Up the Perfect Black Russian Bagel: Tips & Secrets for Your Kitchen Adventure!
So, you’re ready to dive into the delicious world of homemade bagels , and you're starting with the black russian bagel .
Oh my gosh, this isn’t just any bagel; it’s a chewy bagel recipe with coffee-infused dough and a hint of cocoa.
It’s a snack that’ll knock your socks off!
Pro Tips & Secrets to Nail It
First things first, let’s talk about the bagel-making tips i wish someone would have shared with me. when mixing that dough, make sure you knead it enough (about 10 minutes should do it ).
You want that dough smooth and elastic – it’s all about creating that perfect bagel texture!
Next, the yeast situation . be sure your water temperature is just right (around 110° f), so your yeast can do its thing (proofing is a must!).
Otherwise, you might end up with a sad, flat bagel that can't rise to the occasion.
Now, about boiling – don’t skip that step! boiling your bagels in water with a tablespoon of baking soda gives them that lovely bagel crust texture .
Seriously, this makes all the difference.
Perfect Presentation to WOW!
Presentation matters, especially when you want to impress your brunch pals. when you serve your black russian bagels , consider some fun garnishes.
A sprinkle of coarse sea salt or a dash of everything bagel seasoning never hurt anyone!
And let’s not forget color. a cool color combo wows – try pairing the dark bagel with some vibrant veggies or a bright cream cheese spread.
It looks great and tastes even better. your plate will practically scream, "look how gourmet i am!"
Storage & Make-Ahead Tips
Planning a busy week? no worries! you’ve got make-ahead options. once your bagels are baked and cooled (and that’s key – let them cool properly), they can be stored in an airtight container for about 3 days at room temperature .
For longer storage, freeze them! just pop those bagels in a freezer bag, and they'll be good for up to 3 months .
When you’re ready to enjoy, toss them in the oven (or microwave) for a quick reheat, and they’ll be just like fresh.
Creative Variations to Spice It Up
Get creative! think of the flavor variations for bagels . love a bit of spice? toss in some chili flakes or mix in herbs for a zesty kick.
Want sweet? toss in some chocolate chips or dried fruits for that lovely sweet twist. you can even think seasonal – pumpkin spice in the fall or fresh herbs in the summer to keep it fun!
Oh, and if you’re going for dietary modifications, no sweat; swap out the bread flour for all-purpose flour if that’s what you have on hand.
Just be aware your bagels might end up a tad softer.
Complete Nutrition Guide
Let’s not shy away from the numbers! a regular black russian bagel packs about 230 calories , which isn’t bad for such a delightful treat.
They come with some protein, and if you use whole ingredients, they can be part of a nutritious bagel option .
Don’t forget to check for sodium, especially if you’re watching your intake. Pair your bagels wisely—like with fresh veggies or healthy spreads—to keep your plate balanced.
Final Thoughts for Your Bagel Journey
Baking these artisan bagels at home is a fun journey. sure, it takes a bit of time, but trust me, once you take that first bite of a warm black russian bagel with cream cheese, you’ll forget all about the wait.
It’s cozy breakfast recipes done right!
So don’t hold back; get those hands doughy and have fun! whether it’s a savory bagel sandwich or a sweet morning treat, these bagels will bring a little joy into your kitchen and your belly.
Happy baking, friends! 🥯
Frequently Asked Questions
What exactly is a Black Russian Bagel?
A Black Russian Bagel is a unique twist on the classic bagel, featuring cocoa powder and brewed coffee in the dough. This combination results in a chewy texture with complex flavors that make it perfect for breakfast or as a sandwich base.
How can I achieve the perfect chewy texture in my Black Russian Bagel?
To get that desired chewy texture, ensure you knead the dough thoroughly to develop gluten. Also, boiling the bagels before baking is crucial as it creates a chewy crust that complements the soft interior. Follow the kneading and boiling tips provided in the recipe for best results.
Can I make Black Russian Bagels ahead of time?
Yes, you can prepare the Black Russian Bagels ahead of time! After shaping the bagels, you can cover them and refrigerate for up to 24 hours. When you are ready to bake, simply boil and bake them as directed in the recipe for fresh bagels.
What are some variations I can try with Black Russian Bagels?
There are plenty of fun variations you can try! Consider adding chopped olives or sun-dried tomatoes for a savory bagel, or mix in chocolate chips for a sweeter treat. You can also infuse the dough with dried herbs for an aromatic twist.
How should I store Black Russian Bagels to keep them fresh?
To keep your Black Russian Bagels fresh, store them in an airtight container at room temperature for up to 2 days. For longer storage, you can freeze them. Just individually wrap the bagels in plastic wrap and then place them in a freezer-safe bag for up to 3 months.
What are the nutritional benefits of Black Russian Bagels?
The Black Russian Bagel provides a good source of carbohydrates, making it a great energy boost for breakfast or a snack. With 8g of protein per bagel, it can also support muscle maintenance. Adjust contents like sugar or toppings to suit your dietary preferences while enjoying the delightful flavors!
Black Russian Bagel: The Ultimate Guide to Chewy Perfection Card

⚖️ Ingredients:
- 4 cups (500g) bread flour
- 1 tablespoon (15g) instant yeast
- 1 teaspoon (5g) salt
- 1 cup (240ml) warm water (110°F/43°C)
- 2 tablespoons (30g) cocoa powder
- 2 tablespoons (30ml) brewed coffee (cooled)
- 1 tablespoon (15g) sugar
- 1 tablespoon (15g) baking soda
- 1 tablespoon (15g) malt syrup (or honey)
- Coarse sea salt (optional)
- Everything bagel seasoning (optional)
🥄 Instructions:
- Step 1: In a large mixing bowl, combine warm water, yeast, and sugar. Let rest for 5 minutes until foamy.
- Step 2: Add bread flour, cocoa powder, and salt gradually, mixing until a dough forms.
- Step 3: Incorporate brewed coffee and knead until smooth (about 10 minutes).
- Step 4: Transfer the dough to a greased bowl, cover, and let rise in a warm place for about 1 hour or until doubled in size.
- Step 5: Divide the dough into 8 equal portions. Shape each portion into a round ball, then poke a hole in the center and stretch to form a bagel shape.
- Step 6: Place shaped bagels on a parchment-lined baking sheet, cover, and refrigerate for 30 minutes.
- Step 7: Bring a large pot of water to a boil, add baking soda and malt syrup. Boil bagels for 1-2 minutes on each side. Remove with a slotted spoon and place back on the baking sheet.
- Step 8: Preheat the oven to 425°F (220°C). Optionally sprinkle with toppings. Bake for 20-25 minutes until golden brown.
- Step 9: Let bagels cool on a wire rack for at least 10 minutes before serving.
Previous Recipe: Indulge in Luxurious Lobster Mushroom Risotto in 45 Min: My Easy Recipe!
Next Recipe: Razzmatazz Drink: 5 Refreshing Mocktail Recipes to Try!