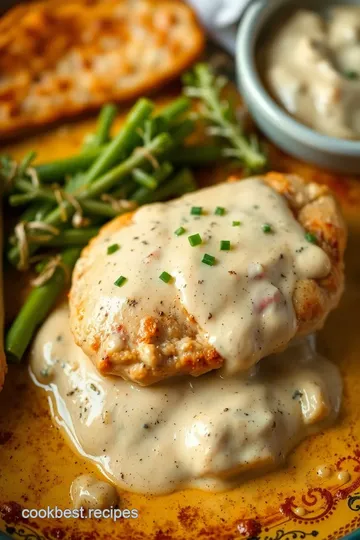
Baked Chicken with Creamy Flavorful Sauce
Looking for a dinner winner? This Baked Chicken with Creamy Flavorful Sauce is tender, savory, and perfect for any occasion. It's a kitchen-tested gem that will have everyone coming back for seconds!

- A Flavorful Journey into Comfort Food
- The Scoop on Deliciousness
- Not Just Chicken—A Nutritional Powerhouse
- Essential Ingredients Guide
- Mastering Professional Cooking Methods: A Deep look into into Baked Chicken with Creamy Flavorful Sauce
- Pro Tips & Secrets
- Perfect Presentation
- Storage & Make-Ahead
- Creative Variations
- Complete Nutrition Guide
- Expert FAQ Solutions
- Recipe Card
A Flavorful Journey into Comfort Food
So, picture this: it’s a chilly evening, you’ve wrapped up a long day, and all you crave is something cozy and warm.
You look around your kitchen and think, “what can i whip up that’s easy but totally comforting?” that’s when the idea of baked chicken with creamy flavorful sauce hits you like a warm hug! trust me, this dish is like your favorite fuzzy blanket on a cold night—satisfying and utterly delightful.
I have a little secret: my obsession with creamy chicken recipes started when i was a kid. my mom would make this killer baked chicken dish, all drenched in garlic cream sauce .
I remember the aroma wafting through the house, making it impossible to be grumpy. this dish isn’t just dinner; it’s a journey down memory lane, and it’s perfect for those family-friendly dinners or when you want to impress your guests!
The Scoop on Deliciousness
This rich, creamy baked chicken with creamy flavorful sauce has its roots in classic italian cuisine, where they mastered the art of making tender chicken breast sing with flavor.
Over the years, it has morphed into a popular american comfort food that brings people together. with just about 55 minutes of your time, you can transform simple ingredients into a meal that feels anything but basic.
Now, let’s get real; even if you’re new to cooking, this is an easy-peasy recipe. it’s rated medium on the difficulty scale.
You’ll mix some basic cooking techniques—like pan-searing—and before you know it, you'll have a dish worthy of a fancy restaurant menu.
Plus, it doesn’t break the bank! you can feed a family of four for under $20, which is a steal these days!
Not Just Chicken—A Nutritional Powerhouse
What makes the baked chicken with creamy flavorful sauce so special? first, let’s talk about those health benefits . chicken is packed with protein and when paired with a rich cream sauce, it can feel like a spa for your taste buds.
The blend of italian herbs like oregano and thyme, combined with that velvety sauce, makes for savory magic on your plate!
You could serve this dish on special occasions, and i promise nobody will turn their nose up. it’s perfect for date night or even a cozy family meal.
And the best part? it’s one of those one-pan chicken meals , meaning less cleanup. win-win!
Now, if you’re looking for something that stands out against other chicken dinner ideas, you’ve found it. The unique flair of our Parmesan cream sauce elevates this humble chicken to status—like who doesn’t want juicy, succulent chicken every night? Add a squeeze of fresh lemon juice, and you’ve got yourself a party in your mouth!
So, get ready because we’re diving into the ingredients you’ll need to whip this up. trust me; the result is a savory baked chicken dish that will leave your friends and family wondering if you’ve secretly taken culinary classes.
Shall we?
Essential Ingredients Guide
Hey there fellow food lovers! ready to dive into the world of cooking? you know, the secret to making unforgettable dishes like baked chicken with creamy flavorful sauce starts with nailing those essential ingredients .
Let’s break it down together, and i’ll share my personal tips and tricks along the way.
Premium Core Components
When it comes to ingredients, quality matters . For your creamy chicken dishes or any delicious baked chicken dishes, you'll want to take a closer look at your staples.
First up, we have measurements . always keep in mind that cooking is just science with a pinch of love. if you’re looking at chicken recipes, it’s useful to have both us & metric measurements on hand.
For example, you’ll need about 1.5 lbs (680 g) of chicken breast for our recipe.
Then, what about freshness tips and selection criteria ? check the chicken! fresh chicken should feel firm to the touch and have a light pink color.
If it smells odd or has darker spots, just walk away. a good rule of thumb is that the shelf life in the fridge for raw chicken is around 1-2 days.
If you need a little longer, pop it in the freezer—it’ll hold well for about 9 months .
Wow, that was a lot of info, huh? But don’t worry! Once you’ve got those premium ingredients, you’re already halfway to making something remarkable.
Signature Seasoning Blend
Let’s chat seasoning. honestly, this is where the magic happens. think of it as the soul of your dish . for this baked chicken, i’m talking about a simple blend of dried italian herbs .
Just one teaspoon goes a long way over that tender chicken breast! you can play around with it too—add some paprika or fresh thyme for extra flair!
Don't forget your aromatics! Garlic is a superstar here. You will want those 3 cloves of minced garlic sautéed into your rich cream sauces; the smell alone is enough to make anyone’s mouth water!
Smart Substitutions
Now, life happens, right? so what do you do when you’re missing an ingredient? that's where smart substitutions come in.
If you find yourself without heavy cream, swap it out with coconut milk or even greek yogurt! trust me, it still creates a luscious sauce.
And if chicken becomes a little scarce, consider using turkey, or if you're on a health kick, boneless, skinless mushrooms can even work in more meatless variations.
Your one-pan chicken meals can easily turn into something unexpected but still delicious.
Kitchen Equipment Essentials
Let’s not overlook your tools either. you really only need a few must-have tools to whip up these savory baked chicken dishes.
An oven-safe skillet is a total game changer! it’s perfect for searing your chicken before popping it in the oven.
Just imagine getting that gorgeous, golden-brown crust on your tender chicken. yum!
For the sauce, grab a whisk to blend ingredients seamlessly, and if you have a thermometer, it’s worth pulling it out! Checking that internal temperature hits 165° F ( 74° C) is key for juicy chicken perfection—and no one likes dry chicken, am I right?
Transition to Instructions
So, now that we’ve covered the essentials, let’s move on to cooking my absolutely favorite recipe: the baked chicken with creamy flavorful sauce .
Get ready to indulge in creamy goodness likened to comfort food recipes passed down through generations. we’ll explore all the simple steps to get that succulent chicken just right.
Trust me, your family will come running to the dinner table!
Stick around; instructions are just a few scrolls away!
Mastering Professional Cooking Methods: A Deep look into into Baked Chicken with Creamy Flavorful Sauce
You know that feeling when you put a dish on the table, and everyone can't wait to dig in? that's the magic of cooking! today, we’re diving into the world of professional cooking methods focused on one of my ultimate comfort food favorites: baked chicken with creamy flavorful sauce .
Let's get you prepped, organized, and ready to impress your friends and family with a dish they won't forget!
Essential Preparation Steps
Before you even turn on the oven, it’s time for some serious mise en place ! this isn’t just chef-speak; it means you’ll have all your ingredients ready to go.
Grab those chicken breasts, season them with salt and pepper, and set up your workstation. trust me, it makes everything smoother.
Time management is crucial too! with this dish, you’ll want about 15 minutes for prep. while the chicken is cooking (that’s around 40 minutes in the oven), you can whip up some sides or toss a salad.
Now, let’s chat about organization strategies . keeping your kitchen tidy is half the battle. as you go, put things away and wipe down surfaces.
It feels great to cook in a clean space, plus it’s safer. and speaking of safety—make sure to use a meat thermometer to ensure your chicken hits 165° f to guarantee it’s safe to eat.
Step-by-Step Process
Ready for the fun part? Here’s a step-by-step overview:
- Preheat your oven to 375° F ( 190° C) . This will ensure your chicken bakes evenly.
- Season those tender chicken breasts with salt and pepper.
- Heat 2 tablespoons of olive oil in an oven-safe skillet over medium-high heat.
- Sear the chicken for about 2- 3 minutes per side until it’s golden brown. Just some browning here adds depth in flavor!
- Remove the chicken and set it aside.
- Now for the sauce! Melt 1 tablespoon of butter in the same skillet. Add 3 cloves of minced garlic and sauté until fragrant (about 1 minute ).
- Whisk in 1 cup of chicken broth and 1 cup of heavy cream . Stir in your dried Italian herbs and 1/4 cup of grated Parmesan . Bring it to a simmer.
- Return the chicken to the skillet , making sure it’s well coated in that rich cream sauce.
- Bake uncovered for 25- 30 minutes . Keep an eye on it! The chicken should reach that internal temp of 165° F .
- Right before serving, drizzle with some fresh lemon juice and sprinkle chopped parsley for a pop of color.
Expert Techniques
Let’s up our game with some expert techniques! When you’re searing chicken , don’t overcrowd the pan. This ensures a gorgeous golden-brown skin.
After making your sauce, check for thickness—if you want a thicker finish, let it simmer a bit longer before adding the chicken back in.
Quality checkpoints: once you’ve flipped the chicken, the sauce should be bubbling gently. if it’s boiling too vigorously, lower the heat.
And keep in mind, if things go sideways, just add a few tablespoons of broth to adjust the texture.
Success Strategies
Mistakes happen, but we can avoid common ones! One biggie is not seasoning well. Don’t hold back. That flavor is what makes delicious chicken in creamy sauce .
For extra assurance of quality, always let your chicken rest after baking for 5- 10 minutes . It keeps that juiciness we love.
For make-ahead options, consider marinating it overnight. If you want to impress without the fuss, this is a total game-changer!
In Conclusion
Cooking is as much an art as it is a science. with baked chicken with creamy flavorful sauce , you've got a surefire winner that’s warm, cozy, and perfect for a family gathering.
Serve it alongside buttery mashed potatoes or a simple salad, and you've got yourself a lovely dinner. so, roll up those sleeves and dive into this succulent chicken recipe—you won’t regret it!
Additional Information
If you’re interested in exploring more delicious options, check out some creamy chicken recipes or think about variations with different herbs and ingredients.
Cooking techniques for chicken can elevate an ordinary dinner into an extraordinary night! happy cooking!

Pro Tips & Secrets
Now let’s talk about some pro tips to make your baked chicken with creamy flavorful sauce an absolute winner! first things first, don’t skimp on seasoning .
Trust me, that sprinkle of salt and pepper makes a world of difference. marinating your chicken for at least an hour in olive oil and herbs can really take it to the next level.
A little time-consuming? maybe. but oh, it’s worth it!
When you’re busy and want to whip up something that feels fancy yet isn’t too complicated, try searing the chicken first.
It locks in that juicy goodness. seriously, a quick 2- 3 minutes on each side is all you need to get that perfect golden-brown crust.
Also, if you want to save some time later, prep your sauce while the chicken is cooking. talk about multitasking!
And flavor enhancement? a splash of lemon juice right before serving adds a fresh zing that transforms the entire dish.
Oh, and if you fancy a thicker sauce, let it simmer a bit longer before adding the chicken back in.
Trust me, your taste buds will thank you .
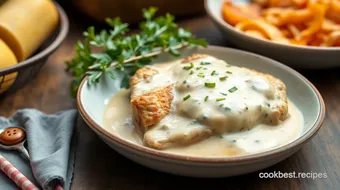
Perfect Presentation
Speaking of impressing your guests (or just your family), let’s talk about presentation . plating may seem like a small detail, but it can turn a simple meal into a notable dish.
Create a lovely base with mashed potatoes or creamy polenta. then elegantly place your baked chicken on top, ladle some of that rich garlic cream sauce over it, and garnish with fresh parsley.
Color combos are key too! think about adding a side of bright roasted veggies for a pop of color. you could go with asparagus, broccoli, or even sliced bell peppers.
Not only do they look beautiful, but they also add healthiness to your meal. visual appeal? you bet!
Storage & Make-Ahead
If you’re wondering about storage , let’s clear that up. keep any leftovers in an airtight container in the fridge .
They'll last about 3-4 days . if you wanna make-ahead, feel free to prep the chicken and sauce a day in advance.
Just stash them separately until you’re ready to bake. reheating is easy; just pop it in the oven at 350° f ( 175° c) for about 15- 20 minutes .
You want it to reach that cozy internal temp of 165° f ( 74° c) .
Creative Variations
Variety is the spice of life, right? with this recipe, there are so many creative variations to play with. you can add sautéed mushrooms or fresh spinach into the sauce for an extra zing.
Want some heat? toss in crushed red pepper flakes .
If you’re feeling a bit adventurous, swap out chicken breasts for thighs . they’re richer and super succulent! also, don’t be afraid to switch up the creamy sauce.
A parmesan cream sauce hits just right, or even try some coconut milk for a twist. this is especially great for gluten-free options, paired with a gluten-free chicken broth.
Complete Nutrition Guide
So what’s in this deliciousness? this baked chicken with creamy flavorful sauce is packed with about 450 calories per serving, giving you a whopping 35 grams of protein to boot.
This is a win for all those muscle-builders out there! and let’s be real —who doesn’t love a comforting chicken dinner idea that combines health with comfort food?
Just keep in mind that if you're watching your carbs, this dish leans low on that front, making it great for low-carb chicken meals.
Pair it with a light salad, and you’re golden!
Expert FAQ Solutions
Got burning questions? i got you covered with some common faqs . if your chicken didn’t turn out juicy, maybe it wasn’t cooked enough, or it spent too long in the oven.
Remember, timing is key !
If you’re considering variations, don’t hesitate to experiment! and if you’ve got leftovers, they’re perfect for a quick lunch. just slice it up, toss it into a wrap, or serve it over rice.
All in all, this baked chicken with creamy flavorful sauce is both simple and elegant, perfect for impressing any guest or just treating your family to a special night in.
With these tips and alternatives, you can easily mix it up to suit any craving you may have. go on, try it out! you’ll be a champ in the kitchen before you know it.
Happy cooking!
Baked Chicken with Creamy Flavorful Sauce Card
⚖️ Ingredients:
- 4 boneless, skinless chicken breasts (about 1.5 lbs / 680 g)
- Salt and black pepper, to taste
- 2 tablespoons (30 mL) olive oil
- 1 tablespoon (15 g) unsalted butter
- 3 cloves garlic, minced
- 1 cup (240 mL) chicken broth
- 1 cup (240 mL) heavy cream
- 1 teaspoon (5 g) dried Italian herbs (e.g., oregano, thyme)
- 1/2 teaspoon (2 g) paprika
- 1/4 cup (60 g) grated Parmesan cheese
- 1 tablespoon (15 mL) fresh lemon juice
- Fresh parsley, chopped, for garnish
🥄 Instructions:
- Step 1: Preheat oven to 375°F (190°C).
- Step 2: Season chicken breasts with salt and pepper.
- Step 3: Heat olive oil in an oven-safe skillet over medium-high heat.
- Step 4: Sear chicken for about 2-3 minutes per side until golden brown.
- Step 5: Remove chicken and set aside.
- Step 6: For the sauce, in the same skillet, melt butter.
- Step 7: Add minced garlic and sauté until fragrant (about 1 minute).
- Step 8: Whisk in chicken broth, heavy cream, herbs, paprika, and Parmesan.
- Step 9: Bring to a simmer, stirring frequently.
- Step 10: Return chicken to skillet; coat with sauce.
- Step 11: Bake uncovered in the oven for 25-30 minutes until chicken is cooked through (internal temp 165°F / 74°C).
- Step 12: Drizzle with lemon juice and garnish with parsley. Serve.
Previous Recipe: How to Make Slow Cooked Pheasant: Juicy & Delicious Family Favorite
Next Recipe: Hearty Slow Cooker Beef Stew with Rich Flavor: A Cozy Classic