Bake Perfect Popovers: Light & Crispy Delight
Ever wondered how to bake perfect popovers? Join me in the kitchen for a delightful experience and learn my tips to create light and crispy delights!

The Joy of Baking Popovers: A Personal Journey
You know those days when you want something light, airy, and just a bit fancy? that’s when i think of popovers.
Oh my gosh, the first time i made them, i was so nervous! i had this dream of pulling a batch out of the oven, grinning from ear to ear as they puffed up like little clouds.
And let me tell ya, nothing beats the moment when you actually nail it . so, if you’re looking to bake perfect popovers: light & crispy delight , you’ve come to the right spot!
Popovers are not just any old dish; they have an interesting story to tell. they originated in england—yep, right there alongside tea and crumpets! the recipe itself is a straightforward blend of eggs, flour, and milk, but don’t let their simplicity fool you.
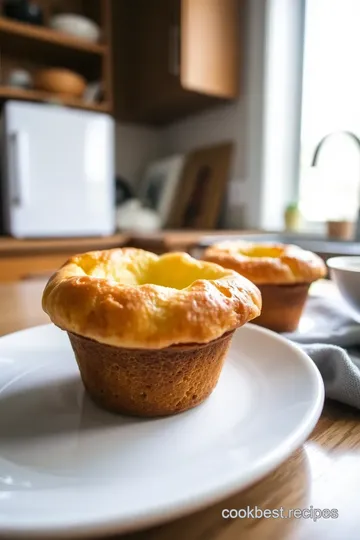
These bad boys are all about achieving that heavenly rise, crispy outside, and a warm, soft interior. it’s like a little magic show in your oven.
Fast forward to today, and they’ve become a brunch staple, popping up everywhere from fancy restaurants to cozy family breakfasts.
Let’s Talk About Popovers!
Alright, before we dive into the how-to part, let’s get real about time and cost. you’re looking at about 15 minutes of prep and 25- 30 minutes of baking .
Pretty sweet, right? in total, you’ll be waiting around 40- 45 minutes for these light and airy popovers to grace your table.
And as for expense, the cost isn’t that steep —probably under $10—which is a total win for such a fancy-feeling treat.
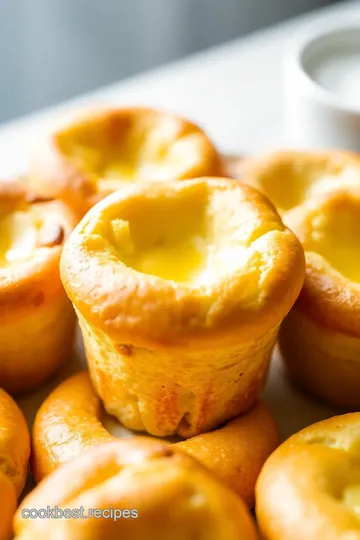
You’ll get about 12 popovers out of this whole shebang, perfect for family gatherings or just treating yourself!
Why You’ll Love Making Popovers
Now, let’s get into the good stuff—the benefits! first off, these light little wonders are a great source of protein from the eggs and can be pretty versatile.
They can come in savory formats, like cheese-filled popovers, or sweet options, with a hint of vanilla and maybe a drizzle of honey! it’s like having a swiss army knife in the baking world.
Wanna impress your guests? serve them these fluffy beauties at brunch, and they’ll think you’ve got a secret chef hiding in your kitchen.
Trust me when i say they’re perfect for special occasions, like a cozy family dinner or a fancy brunch with friends.
Plus, they beat store-bought versions—nothing compares to fresh, homemade popovers made with love and maybe a dash of chaos in the kitchen.
Crafting the Ultimate Popovers
Let’s talk about the secret sauce: how to make the perfect popover batter. the popover cooking times and technique are crucial.
High oven temperature is where the magic begins! oh, and don’t even think about peeking while they’re baking. seriously, you gotta resist that urge! it’s like sneaking a peek at your birthday cake; just let it be.
And remember, the ingredients need to be room temperature ! This helps create a better batter consistency and rise. You can also try a gluten-free popover recipe if you’ve got dietary restrictions, or go wild with unique popover fillings!
Time to Get Cooking!
Feeling inspired? get ready to whip out your popover pan (or muffin tin if that’s what you’ve got). with some simple ingredients and a sprinkle of determination, you’ll be well on your way to creating something magical.
Before you know it, you’ll be pulling those popovers out of the oven, enjoying that glistening, crispy top, and asking yourself, “why didn’t i make these sooner?”
Next up, grab your ingredients, and let’s make those popovers happen. trust me, the satisfaction you’ll feel when they puff up is just the beginning.
Each bite will be a fluffy popover texture you won’t forget. so, let’s get our bake on!
Your Essential Ingredients Guide: The Secret to Baking Perfect Popovers
Alright, let’s get into it! if you’re looking to elevate your brunch game, or just want to indulge in some light and airy popovers , you’ve come to the right place! trust me, these little pillows of joy deserve a spot on your table.
I’ve had my share of baking adventures (and misadventures), but once you get the hang of these, they’ll turn out chef’s kiss .
So, let’s dive in!
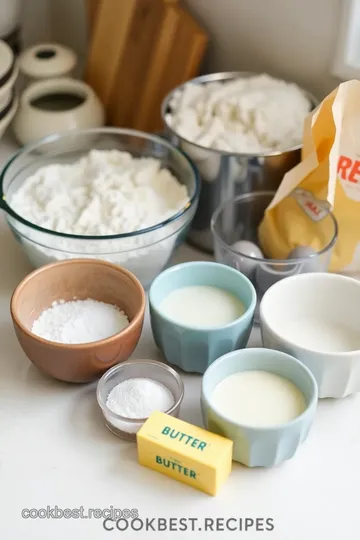
Premium Core Components
First up, let’s talk premium core components . You need some basic stuff to whip up that homemade popover batter.
-
Measurements: for the batter, use 1 cup (120g) of all-purpose flour, 1 cup (240ml) of whole milk, and 3 large eggs .
Trust me, precision is key, so get those measuring cups out!
-
Quality indicators: make sure your flour is fresh, no funky smells. your milk should be good too; don’t open that carton if it's been lurking in the fridge for ages.
Fresh ingredients make a huge difference.
-
Storage Guidelines: Ingredients like flour and eggs should be stored in a cool place. Your milk? Keep it in the fridge, obviously! Once opened, try to use it within a week.
-
Freshness Tips: Always check for that ‘best by’ date. Fresh milk and eggs = fluffy popovers.
Signature Seasoning Blend
Now, let’s get into flavor! You want your popovers to sing, right?
-
Essential Spice Combinations: Keep it simple with salt ( 1/2 teaspoon ) in your batter. It really brings out the flavor.
-
Herb Selections: For savory popover variations, think about adding herbs like thyme or rosemary directly to the batter. It’s those classic popover tips that makes them extra special.
-
Flavor Enhancers: You might want to experiment with adding garlic powder or even cheese for a cheesy popover twist. Can anyone say, cheese-filled popovers ? Yes, please!
-
Regional Variations: Take inspiration from English popovers and add a dash of ale for a unique, hearty flavor. Honestly, it's a game changer.
Smart Substitutions
We’ve all been there—faced with certain pantry limitations. So here’s how to roll with it!
-
Common Alternatives: Don’t have whole milk? Use 2% or, for a dairy-free option, unsweetened almond milk works. Just know that you might lose a bit of that pop .
-
Dietary Modifications: If you’re going gluten-free, swap all-purpose flour for a gluten-free blend. Just check that it has xanthan gum for that magic binding action!
-
Emergency Replacements: Running short on eggs? You can substitute with a flaxseed meal (1 tablespoon mixed with 2.5 tablespoons water = one egg). Who knew?
-
Seasonal Options: When it’s summertime, toss in some fresh herbs or even a bit of zucchini. It keeps things vibrant!
Kitchen Equipment Essentials
Let’s not forget your tools! Here’s what you'll need to make those oven-baked popovers a reality.
-
Must-Have Tools: A popover pan is ideal—really helps achieve that fluffy popover texture. Could also use a muffin tin if that’s all you got!
-
Alternative Equipment Options: If you’ve got a baking dish, you can use that too. Just make sure to grease it well.
-
Preparation Tips: Whisk those eggs before adding milk to get some air incorporated! It’ll help your popovers rise like a boss.
-
Storage Solutions: Airtight containers work best for keeping leftover popovers (if you have any!). But honestly, they’re best fresh, so…
There you have it! armed with these essential ingredients and tips, you’re ready to bake perfect popovers: light & crispy delight .
Don’t skip the details; those small adjustments can make or break your baking game. now let's get to the fun part—putting it all together with step-by-step popover instructions! happy baking!
Master the Basics of Professional Cooking
If you've ever watched a cooking show, you know that chefs make it look easy. but trust me, there’s a whole lotta prep work that goes into it.
Want to bake perfect popovers: light & crispy delight ? let’s dive into the essential steps that’ll make your culinary journey not just easier but also a bit more fun.
Seriously, cooking doesn’t have to be a chore!
Essential Preparation Steps
Okay, first things first— mise en place . it’s a fancy french term that just means you get everything ready before you start cooking.
So, measure out your ingredients and have them within arm's reach. this not only cuts down on stress but also gets you in the zone.
Trust me, no one wants to be frazzled when you should be focusing on that creamy homemade popover batter.
Now, let's talk about time management . this is critical, especially when you’re working with baked goods like popovers. you don’t want to be rushed, so try to pace yourself.
Set a timer for each step of the process. honestly, timers are your best friend in the kitchen. they keep you on track and allow you to focus on getting that fluffy popover texture just right.
Another biggie is organization strategies . make sure your workspace is clear and tidy. you can’t whip up some light and airy popovers if you’re sifting flour over a cluttered counter! plus, it’s easier to find everything when it’s all in place.
And, of course, safety . when you’re in the kitchen, always remember to watch out for hot surfaces and sharp objects.
Keep a fire extinguisher handy, just in case some baking accidents happen (not that we don’t love a little adventure in the kitchen!).
Step-by-Step Process
Let’s break down the popover-making process, step-by-step. You’ll feel like a pro in no time.
-
Preheat Oven : Set that oven to a whooping 450° F ( 230° C) . This high heat is what gets those popovers to rise like they’re on a mission.
-
Prepare the pan : grease your popover pan or muffin tin with some butter or a bit of non-stick spray.
This is crucial if you want those crispy popovers to pop right out.
-
Mix the batter : in a bowl, whisk together 1 cup of all-purpose flour and 1/2 teaspoon salt . in a separate bowl, whisk 1 cup of room temperature whole milk and 3 large room temperature eggs until smooth.
Mix it all together gently; lumps are okay, but don’t go crazy whisking.
-
Fill the Pan : Pour the batter into each cup, filling them about halfway. Don’t overfill, or you’ll have a popover explosion that's messy!
-
Bake : Here’s where the magic happens. Pop them in the oven for 20 minutes —don’t even think about opening that door! You want ‘em golden and puffed up.
-
Reduce the temperature : after that, lower the heat to 350° f ( 175° c) and bake for another 5- 10 minutes .
This is where they get nice and crispy on the outside.
-
Cool and Serve : Give them a minute to cool before flipping them out of the pan. You’ve just made some absolute beauties!
Expert Techniques for Success
Now let’s level up a bit. professional cooks have tricks that you can totally benefit from too. for starters, always check your popover batter consistency .
It should be thin but not too watery. if it looks like pancake batter, you’re on the right track!
Also, pay attention to popover cooking times . too little time means they won’t rise properly; too much, and they’ll deflate faster than a party balloon.
It’s like, why can't they just be perfect every time?
And don’t freak out if they don’t turn out the way you hoped. common popover mistakes include opening the oven door too soon or not using room temperature ingredients.
Solve that one next time, and you'll be golden!
Success Strategies
So, how do you ensure your popovers are a hit? well, skip the common mistakes like poorly blended batter or baking without preheating.
Always trust your gut when it comes to ingredients! if they aren’t fresh, they’ll leave your popovers flat.
A huge tip: serve them hot! popovers are like little pillows of happiness and are best enjoyed fresh out of the oven.
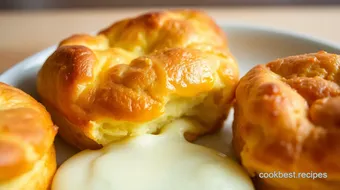
Try pairing them with a rich beef stew or maybe some honey butter for a little extra yum!
Ready to Pop?
In summary, the journey to bake perfect popovers is totally doable. with these step-by-step popover instructions and expert techniques in your back pocket, you’ll be the star of your kitchen before you know it.
Try it out and see how much fun you can have with these light and crispy delights. whether for sunday brunch or special occasions, perfecting this classic popover recipe is definitely worth the effort.
Now, before diving in deeper, let’s check out some additional information to round out your popover-making experience!
Expert Tips for Perfect Popovers: Light & Crispy Delight
Picture this: a brunch table loaded with various dishes, and right in the center are light and airy popovers . they puff up like magic, golden brown and crispy on the outside, ready to be devoured.
Want to bake perfect popovers ? let me spill some of my personal insights and secrets so you can achieve that drool-worthy result every single time.
Pro Tips & Secrets
Let’s kick things off with the basics. to start, always use room temperature ingredients . seriously! this little hack helps the batter come together beautifully, creating that fluffy popover texture we all crave.
If you can remember one thing, it’s to avoid the urge to peek at your popovers while they’re baking. trust me, opening that oven door can cause them to deflate faster than a balloon at a kid’s party.
When it comes to flavor, don’t hold back. you can easily whip up savory popover variations by tossing in some grated cheese or fresh herbs to the batter.
Wow, imagine cheese-filled popovers right out of the oven! or, if you’re feeling sweet, a touch of vanilla can transform your classic popover into a scrumptious treat.
Perfect Presentation
Now let’s chat about presentation because we eat with our eyes first, right? popovers can be as stunning as they are delicious.
Consider plating them in an old-fashioned rustic basket lined with a pretty cloth. for garnishing, fresh herbs like thyme or even a sprinkle of sea salt sprinkle can add visual appeal.
Also, experiment with color combinations ; how about pairing those golden popovers with vibrant fruit preserves or a colorful salad?
Storage & Make-Ahead
If you’ve got some extra popovers, you might wonder how to keep them fresh. storage is key! they’re best eaten soon after baking, but if you must, store them in an airtight container for up to two days at room temperature.
To reheat , pop them back in a hot oven (about 350° f) for a few minutes until crispy again.
Planning ahead? you can make the homemade popover batter a day in advance! just cover it and leave it in the fridge overnight.
Just be sure to give it a good stir before using, so it’s all mixed up and nice.
Creative Variations
Feeling a little adventurous? There are endless ways to adapt your popovers! How about sweet popover ideas on a chilly Sunday morning where you fill them with fruits and whipped cream? Or, perhaps a gluten-free popover recipe for any friends who can’t handle gluten? All you need is a cup of quality gluten-free flour, and boom, you’re in popover heaven!
Oh! And don't forget about seasonal twists! Need a little holiday flair? Try adding pumpkin spice or a hint of cinnamon to your batter in the fall—yes, please!
Complete Nutrition Guide
Worried about that comfort food indulgence? here's a quick breakdown: each popover runs about 90 calories with 3g of protein.
Not bad for a lil' indulgence. plus, they’re packed with nutrients from real ingredients like eggs and milk. just keep an eye on those portion sizes, especially when you realize how addictive they are!
Expert FAQ Solutions
Let’s wrap up with some of my favorite troubleshooting tips. got a flat popover? likely, it was too cold or didn’t spend enough time in the hot oven.
Remember, high-temperature oven baking at the beginning is crucial for that ideal rise. and if you ever wonder why your popovers stick, it might be time to rethink your greasing method.
A good pat of butter does wonders in a popover pan—don’t skimp!
Encouraging Conclusion
Baking popovers is simpler than it seems, and with these best popover tips , you’re well on your way to impressing friends and family with your baking prowess.
Look into into this fun cooking adventure and let each popover bring a little joy to your table. whether you’re whipping them up for a cozy dinner or to impress at brunch, these will surely be a hit.
Now go ahead, bake perfect popovers and enjoy every delightful bite!
Bake Perfect Popovers: Light & Crispy Delight Card
⚖️ Ingredients:
- 1 cup (120g) all-purpose flour
- 1 cup (240ml) whole milk, at room temperature
- 3 large eggs, at room temperature
- 1/2 teaspoon salt
- 1 tablespoon (14g) unsalted butter, melted (for the batter)
- 1 tablespoon (14g) unsalted butter, softened (for greasing)
- Optional: Non-stick cooking spray
🥄 Instructions:
- Step 1: Preheat your oven to 450°F (230°C).
- Step 2: Grease each cup of the popover pan with softened butter or cooking spray.
- Step 3: In a mixing bowl, whisk together the flour and salt until combined. In a separate bowl, whisk together the milk and eggs until smooth. Gradually add the milk mixture to the flour, whisking until just combined (lumps are okay). Stir in melted butter.
- Step 4: Pour the batter evenly into each cup, filling them about halfway.
- Step 5: Place the pan in the preheated oven and bake for 20 minutes without opening the oven door, until they have puffed and are golden brown.
- Step 6: Lower the oven temperature to 350°F (175°C) and bake for an additional 5-10 minutes until golden and crispy.
- Step 7: Remove from the oven and let cool for a minute before gently removing from the pan. Serve immediately.
Previous Recipe: Ultimate Slow Cooked Beef Tender in Rich Tomato Sauce: A Hearty Comfort Meal
Next Recipe: Ultimate Slow Cooker Chorizo Chili - Easy & Flavorful for Cozy Nights!