Delicious Bake Cauliflower Pizza with a Crispy Crust
Want a guilt-free pizza night? Try my Bake Cauliflower Pizza with Crispy Crust! It's light, tasty, and perfect for veggie-lovers. You’ll love it!

look into Into Bake Cauliflower Pizza with Crispy Crust
Have you ever found yourself staring at a box of pizza, feeling both excitement and a pinch of guilt? trust me, i’ve been there.
One night, feeling way too cozy on my couch, i decided to experiment. what if i could enjoy pizza without the heavy guilt that usually follows? enter my bake cauliflower pizza with crispy crust .
This dish has become a must-have in my home, and it might just become yours too.
The Tasty Journey of Cauliflower Pizza
It's incredible how food trends evolve over time. the cauliflower crust pizza craze truly took off as folks started seeking out more gluten-free pizza recipes and healthier alternatives to traditional pies.
If you think about it, pizza parties are a staple in american culture, whether it's family game night or just a casual hangout.
So breaking down the pizza into a lighter, veggie-based version? genius!
Making this pizza is pretty simple. you’ll want to set aside about an hour for prep and cooking . and it’s not rocket science! a little chopping, baking, and voila—you’ve got a delicious pizza that won’t weigh you down.
Plus, it usually costs just a fraction of what you’d pay for takeout.
Why You’ll Love This Recipe
First off, let's talk about the health benefits . cauliflower is loaded with vitamins and provides a solid punch of fiber, making it one of those underrated ingredients that sneak health into your meals.
Plus, it’s a low-carb pizza option, and if you’re looking for keto-friendly recipes , this one checks off all the boxes.
What’s cooler? you can whip it up for dinner on just a regular tuesday or for special gatherings. it’s an incredible centerpiece for a casual pizza night and brings a creative twist to your table.
Just imagine the “wow” factor when you slice into that crispy crust!
If you’re concerned about dietary restrictions , don’t sweat it. this pizza can easily become a dairy-free pizza crust or even a vegetarian pizza recipe just by swapping out the cheese.
And those who love trying out different flavors? you can get creative with pizza variations that suit everyone’s tastes.
The Crispy Crust That Dreams Are Made Of
Now, onto the secrets of achieving that crispy crust . patience is key! make sure you get as much moisture out of the riced cauliflower as possible.
Trust me, soggy pizza is not where you want to be. and if you want to take your pizza game to the next level, preheat your baking sheet! it’s a little trick i learned; it gives the base a head start to crispiness.
Not to mention, this method helps you skip the guilt trip that usually comes with your average pizza. and if you’re like me and often wonder about the nutrition facts for cauliflower pizza, it’s good news: you get a light and satisfying meal without the extra calories.
In just a bit, i'm going to break down the ingredient list for you. trust me; you probably already have most of these items in your kitchen.
No specialty shopping required! we’ll use that riced cauliflower to make the dough, mix it with some cheese and seasonings, and then top it with whatever veggies your heart desires.
So, are you ready to get your bake on? Let’s see what we need to gather to create this delightfully guilt-free pizza together!
Essential Ingredients Guide for Bake Cauliflower Pizza with Crispy Crust
Let’s dig into the key components that will elevate your pizza-making game. you might think making a delicious bake cauliflower pizza with crispy crust is just about the cauliflower itself.
Nope! it’s about blending the right elements that’ll make your taste buds dance.
Premium Core Components
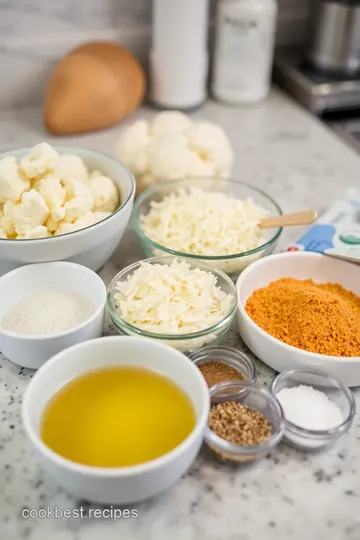
Alright, first things first: each ingredient matters . for this cheeky pizza dough, the star is riced cauliflower (about 4 cups or 600g ).
But you’ve also got to think about other essentials. a large egg binds everything, while 1 cup (100g) shredded mozzarella and 1/2 cup (50g) grated parmesan provide that cheesy goodness.
Your secret weapon?
Garlic powder and dried oregano . just 1 teaspoon of each will sneak that flavor into the crust, plus some salt and pepper .
These little guys are like the pillowy clouds on a sunny day—essential to the pizza vibe.
Storage tips: riced cauliflower can sit pretty in the fridge for about 3-5 days if stored right. just pack it in an airtight container.
As for cheese, look for brands that have minimal additives, making sure good melting without fuss.
Signature Seasoning Blend
One of the best parts about making your own cauliflower crust pizza is the flexibility with flavors! think about those herb selections you can use.
Basil, oregano, or even thyme can be playful partners with the crust.
And spice combinations —oh boy! toss in a pinch of red pepper flakes or some smoked paprika for a kick.
Depending on what you have in your pantry, go wild with regional variations . how about mixing in some bbq sauce instead of the classic pizza sauce? we’re talking creative pizza variations here!
Smart Substitutions
Now let’s be real—sometimes life happens, and you might not have the exact thing you need. need a substitute? no problem! use nutritional yeast if you're out of parmesan, or for a vegan twist, flaxseed meal can take over that egg’s role.
Stuck without sauce? a drizzle of olive oil and your favorite herbs can do the trick. and if you’re suddenly craving something fruity, peaches on pizza might just blow your mind! these smart replacements keep your pizza night ideas fresh and fun.
Kitchen Equipment Essentials
Okay, let’s step into the culinary playground. you don’t need high-tech magic here, just good ol’ must-have tools. a food processor or a box grater makes ricing your cauliflower a walk in the park.
Following that, you’ll need a mixing bowl and a baking sheet (don’t forget the parchment paper!).
Now, if you’re committed to becoming a pizza pro, consider a pizza stone down the line. it’s like an oven’s best-kept secret for those crispy crust techniques .
You’ll be flipping your pizzas like a pro in no time!
Cooking Tips for Crispy Crust
Got your components ready? here’s the kicker: dry that cauliflower out! after steaming it, wring out as much moisture as you can.
Trust me, a soggy crust isn’t what you want. when shaping your crust, aim for about 1/4 inch thick —thinner means crispier!
For extra crunch, you can even preheat your baking sheet before popping your crust in. It’s like giving it a warm welcome to crispy-tastic town.
Now that you're stocked with essential ingredients and tips for making your cauliflower crust pizza experience top-notch, let’s roll up our sleeves!
Ready to dive into the step-by-step instructions ? Let's get this pizza party started!
Mastering the Professional Cooking Method
When it comes to cooking professionally, there’s no one-size-fits-all approach. but a truly successful experience revolves around one word: prep .
So, buckle up, folks. we’re diving into the nitty-gritty of cooking like a pro, starting with the absolute essentials.
Essential Preparation Steps
First things first, let’s talk about mise en place . this fancy french term simply means “everything in its place.” imagine having all your ingredients prepped and ready to go before you even turn on the stove.
Don’t you hate it when you’re halfway through a recipe and realize you’re missing an ingredient? i sure do! so, set out your ingredients like a tailored buffet.
It saves time and stress—seriously!
Now, onto time management . you don’t want your sauce simmering while your pasta’s sitting in cold water, right? keep an eye on the clock.
Timing is everything in cooking. i once started sautéing vegetables only to forget about my chicken in the oven. lets just say, it wasn’t pretty!
Organization is a massive factor here. keeping your workspace tidy helps prevent chaos. i recommend cleaning as you go. it’s like a game—who can keep the workspace spotless and finish the dish first? spoiler alert: i’ve lost this game more than once, but it’s always a fun challenge.
And let’s not ignore safety ! when you're handling hot pans and sharp knives, it’s essential to stay on the ball.
A little focus can go a long way in keeping your fingers and your dignity intact. always use oven mitts when grabbing hot stuff, and keep those knives in their place until you need ‘em!
Step-by-Step Process
Alrighty, let’s break it down into simple, numbered steps. Here we go:
-
Preheat it Up : Make sure to preheat your oven to 425° F ( 220° C) . It needs to be hot to get that crispy crust you’re dreaming of.
-
Prepping the Cauliflower : Remove the leaves, cut it into florets, and rice that sucker with a food processor. You should end up with about 4 cups of riced cauliflower .
-
Cooking the cauliflower : steam it for about 4- 5 minutes until it’s tender, then cool it off.
Don’t forget to squeeze out the moisture. trust me, a soggy crust is not the goal here.
-
Mix It Up : Combine your riced cauliflower, a beaten egg , and all that cheese. Ooh la la, it’s getting cheesy in here!
-
Shape It Up : On a parchment-lined baking sheet, mold your mixture into a round shape—about a 1/4 inch thick .
-
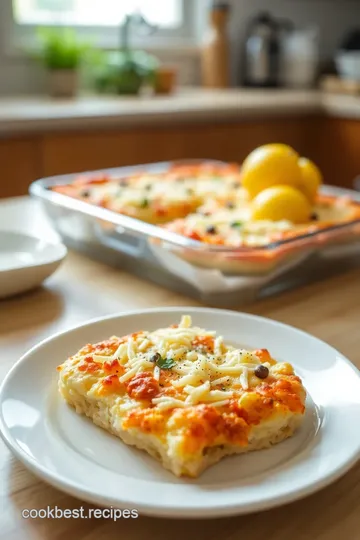
Bake It : Pop that crust into your preheated oven for 20 minutes . You want it golden brown and crisp.
-
Top It : Pull it out, smother it with sauce and cheese, and add whatever toppings tickle your fancy.
-
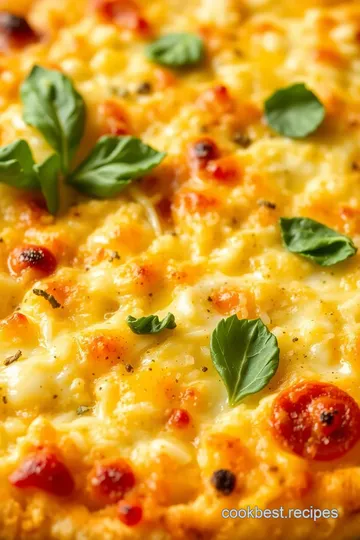
Bake Again : Toss it back in the oven for another 10- 15 minutes until the cheese is melty and bubbly.
-
Slice & Serve : Let it cool a bit before slicing and dig in!
Expert Techniques
Alright, let’s elevate this pizza experience! Here are a few expert techniques that really bring out the best in your bake.
-
Critical Steps : Make sure everything is well-combined. No one wants a mouthful of just egg!
-
Quality Checkpoints : Trust your eyes. That golden crust is your best indicator for perfect doneness. If it ain’t golden, it ain’t done.
-
Troubleshooting Tips : If your crust comes out soggy, next time, try removing more moisture from the cauliflower, or bake it longer.
Success Strategies
Now, who doesn’t love avoiding mistakes? Here’s what I’ve learned over the years:
-
Common Mistakes : Don’t rush the ricing or drying process. Moisture is the enemy of a crispy crust!
-
Quality Assurance : Taste test every stage. You might need more seasoning—never shy away from those flavorful herb combinations .
-
Perfect Results Guide : Aim for that crispy bottom. If you’ve got a pizza stone, use it!
-
Make-Ahead Options : You can prepare your crust in advance and freeze it. Just reheat and add toppings!
And while we’re on the subject, if you’re looking for a fun spin on a regular pizza night, this bake cauliflower pizza with crispy crust is a total hit.
It’s a gluten-free pizza recipe that doesn’t skimp on flavor, perfect for keto-friendly recipes or just a light and healthy dinner.
Additional Information
If you want to dive deeper into the world of vegetarian pizza recipes , think about bringing veggies like roasted peppers and olives into play.
You can even switch up your sauce—try pesto next time if you want a surprise twist. no matter how you slice it, you’ll have delicious veggie pizzas that your friends and family will rave about! so, don’t wait—get in the kitchen and start experimenting with your cauliflower crust pizza !
Pro Tips & Secrets to Perfectly Bake Cauliflower Pizza with Crispy Crust
Alright, pizza lovers! if you’re excited to dive into bake cauliflower pizza with crispy crust , you’re in for a treat.
This recipe isn’t just about making a gluten-free pizza; it’s about crafting a light, scrumptious meal that won’t have you feeling guilty later.
Here are some chef-approved tips that’ll turn your kitchen into a mini pizza parlor!
Pro Tips for Success
You wanna make that crust fantastically crispy, right? here’s the scoop: make sure to wring out the excess moisture from your riced cauliflower .
I can’t stress this enough. the more moisture, the soggier your crust. think of it like a workout for your cauliflower—give it a good squeeze!
And here’s another gem: preheat your baking sheet while the oven heats up . Seriously, this little hack will give your crust that extra bit of crunch that you dream about at 3 AM!
Want to jazz it up? Grab some flavorful herb combinations and toss 'em right into your cauliflower mix. A pinch of basil or oregano can make all the difference!
Perfect Presentation
When it comes to plating, we eat with our eyes first, right? use a round baking sheet to give your pizza that classic look.
After baking, consider garnishing it with fresh basil leaves or a drizzle of balsamic glaze. it adds a pop of color and looks oh-so-fancy for a veggie pizza!
If you want to make your pizza night instagram-worthy, experiment with toppings. think colorful veggies like roasted bell peppers, cherry tomatoes, and even some wilted greens.
The more color, the more inviting it looks on your table.
Storage & Make-Ahead Tips
Let’s be real—who doesn’t want to enjoy pizza on a busy weeknight? you can totally prep this cauliflower pizza crust in advance.
Just make the base, bake it, and then let it cool. wrap it up tightly and store it in the fridge.
It’ll last for about three days .
When you’re ready to feast, just add your toppings and pop it in the oven. for storing leftovers, keep them in an airtight container in the fridge for about 2 days .
You can reheat it at 350° f for about 10- 15 minutes or until heated through. it’s an easy-peasy dinner situation!
Creative Variations
Oh, the possibilities for a low-carb pizza are endless! you can experiment with different toppings based on what’s fresh. seasonal twists like roasted squash in the fall or zesty citrus in the summer add a fun flair to your pizza night.
Need a dairy-free version? Try using a dairy-free pizza crust or switching to a nut-based cheese. It’s a great option for everyone in the family!
Complete Nutrition Guide
Here’s the tasty news: this cauliflower pizza is not just guilt-free but also packed with goodness! just one slice gives you healthy doses of fiber and protein , making it a fulfilling meal.
If you’re tracking macros, it’s got all the nutrition facts you need while keeping your dinner light.
Expert FAQ Solutions
You might wonder why your crust didn’t turn out crispy enough. the main culprits? not enough moisture removal or baking at the right temperature.
If your crust fell flat (pun intended), just adjust these points and try again!
And really, don’t be afraid to ask questions. The cooking community is HUGE! When doubts arise, just reach out and get tips from others.
Conclusion
Pizza night just got an upgrade with the ability to bake cauliflower pizza with crispy crust ! it's simple, delicious, and a blast to customize.
So grab that riced cauliflower and let’s make a pizza that not only tastes good but makes you feel good about what you eat.
Honestly, your taste buds and gut will thank you! happy cooking, friends!
Delicious Bake Cauliflower Pizza with a Crispy Crust Card

⚖️ Ingredients:
- 1 medium head of cauliflower (about 4 cups riced) (approximately 600g)
- 1 large egg, beaten
- 1 cup (100g) shredded mozzarella cheese
- 1/2 cup (50g) grated Parmesan cheese
- 1 teaspoon garlic powder
- 1 teaspoon dried oregano
- 1/2 teaspoon salt
- 1/4 teaspoon black pepper
- 1/2 cup (120ml) pizza sauce or marinara
- 1 cup (100g) shredded mozzarella cheese (additional)
- 1/2 cup (75g) sliced bell peppers (or your choice of veggies)
- 1/4 cup (50g) sliced black olives (optional)
- Fresh basil leaves for garnish (optional)
🥄 Instructions:
- Step 1: Preheat the oven to 425°F (220°C).
- Step 2: Remove leaves from the cauliflower and cut into florets.
- Step 3: Rice the cauliflower using a food processor or box grater.
- Step 4: Steam or microwave the riced cauliflower until tender, about 4-5 minutes.
- Step 5: Let cool, then wring out excess moisture using a clean kitchen towel.
- Step 6: In a mixing bowl, combine the cooked and cooled cauliflower, beaten egg, mozzarella, Parmesan, garlic powder, oregano, salt, and pepper.
- Step 7: Mix until fully incorporated.
- Step 8: Line a baking sheet with parchment paper.
- Step 9: Spread the cauliflower mixture onto the baking sheet, forming it into a round shape about 1/4 inch thick.
- Step 10: Bake in the preheated oven for 20 minutes, or until golden brown and crispy.
- Step 11: Remove the crust from the oven and spread the pizza sauce evenly on top.
- Step 12: Sprinkle with additional mozzarella cheese and your preferred toppings.
- Step 13: Return to the oven for another 10-15 minutes, until cheese is melted and bubbly.
- Step 14: Let cool slightly before slicing. Garnish with fresh basil if desired.
Previous Recipe: Why You'll Love to Cook Creamy Buttermilk Oatmeal in 10 Minutes
Next Recipe: Ultimate Simmered Pork Chili Verde with Tomatillos: A Family Favorite