Apple Apple Pear Galette
Craving a warm dessert? This apple apple pear galette, filled with sweet juicy fruit and a buttery crust, is my go-to for cozy evenings. Enjoy it warm!

- The Cozy Allure of an Apple Apple Pear Galette
- Essential Ingredients Guide
- Mastering the Professional Cooking Method: Steps to Success in Your Kitchen
- Pro Tips & Secrets for Your Apple Apple Pear Galette
- Perfect Presentation of Your Galette
- Storage & Make-Ahead
- Creative Variations
- Complete Nutrition Guide
- Expert FAQ Solutions
- Recipe Card
The Cozy Allure of an Apple Apple Pear Galette
Have you ever strolled through a farmer's market in autumn, that crisp air wrapping around you like a cozy blanket? i can still remember the first time i spotted the perfect apples and pears, sunlight streaming through the trees, illuminating their shiny skins like jewels.
One bite into those juicy fruits sent a wave of nostalgia rolling over me—everything that reminds you of home, warmth, and simple pleasures.
That’s exactly how my apple apple pear galette makes me feel. it’s like a slice of fall, served warm, right out of the oven.
This recipe isn’t just delicious; it’s a way to embrace the changing seasons and all the flavors they bring. it's the perfect autumn dessert idea.
Trust me. if you want a rustic fruit tart that’s not just easy to make but also looks oh-so-impressive, you've hit the jackpot with this one!
A Peek into the Past and Present of Galettes
The galette is a classic french tart, and boy, do they know how to make simple ingredients shine! traditionally, it's a free-form pastry that allows the fruit to shine—no stressing about the perfect crust or fussing over detail.
And just like that, over the years, we’ve made it our own, especially here in the states. this fruit galette recipe is super popular today, thanks to its inviting nature and versatility.
Plus, it's easier to whip up than a traditional pie, which can be a bit of a science experiment sometimes.
You’ve got about 25 minutes of prep time , with a little chill while you sip on some cider, and then it’s into the oven for about 40 minutes.
So, if you're worried about the skill level, don't be! it’s marked as medium , suitable even for kitchen newbies.
It's a bit like riding a bike—once you get the hang of the homemade pie crust , you’ll be flying!
Why You’ll Love This Galette
Okay, let’s get down to the nitty-gritty. this apple pear dessert is not just another pretty face; it packs some serious health benefits too! apples and pears are loaded with vitamins and fiber, making each bite feel like self-care wrapped in flakiness.
You get to indulge while telling yourself, “hey, it’s good for me!” the aroma of cinnamon wafting through your kitchen defines comfort food—perfect for special gatherings or cozy family nights in.
And let's not forget how adaptable this gem can be. you can toss in some cranberries for tartness or even drizzle a little caramel for those sweet tooth cravings.
This galette serves perfectly warm and can be topped with a scoop of ice cream for that dreamy, decadent touch! seriously, who can resist that combo?
Makes You Wanna Dig In
You’ve got the whole vibe with this cinnamon apple pear galette —it's rustic, it’s comforting, and you can feel the love that goes into every bite.
Plus, it makes a delightful centerpiece for any fall gathering! can you imagine serving this beauty to your friends? they'll be asking for your secret in no time!
So, if you're ready to get started on this apple apple pear adventure, gather your ingredients. you’re just a few steps away from a mouthwatering dessert that truly celebrates seasonal fruit in all its glory.
Trust me, once you take that first bite of the flaky pastry filled with warm, spiced fruit—oh, and maybe a drizzle of honey? you’ll be transported to that farmer’s market on a golden autumn day.
Alright, let's move on to what you'll need to make this delicious fruit galette !
Essential Ingredients Guide
Hey there, fellow kitchen ensoiasts! let’s dive into the essential ingredients for whipping up your favorite rustic fruit tart, or what i like to call an apple apple pear galette .
The beauty of this dessert lies in its simplicity, but trust me, the right ingredients will take it to the next level.
Premium Core Components
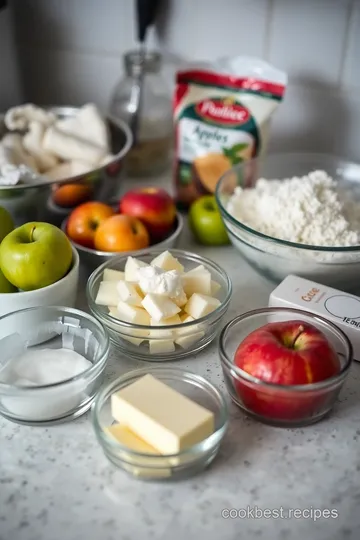
First up, let’s talk about the premium core components . You might be wondering what you really need to get started. Here’s a quick rundown of some essential ingredients:
-
Flour: you're gonna need about 1 ½ cups (190g) of all-purpose flour. look for something nice and fresh. if it’s been sitting in your pantry for ages, it might not give you that flaky pastry you’re after.
-
Sugar: Just a tablespoon or so — about 12g of granulated sugar — for the crust. It shouldn’t overpower the fruit, but just enough to make it shine.
-
Butter: Aim for ½ cup (113g) , unsalted and ice-cold. This is your secret weapon for that buttery crust. And do pay attention to its freshness; if it smells off, toss it!
-
Filling fruits: for that apple apple pear goodness, grab 2 medium apples and 2 medium pears . choosing the right kind is a game changer; i swear by granny smith for tartness and bartlett pears for sweetness.
So what’s the storage deal? keep your apples and pears in the fridge to stay fresh for a while, while your flour and sugar can chill in a cool, dry spot.
As for the butter, best to use fresh, preferably within a month of the sell-by date!
Signature Seasoning Blend
Now, let's jazz it up with some seasoning! my go-to blend for this galette includes cinnamon (1 teaspoon, if you're wondering) and a touch of vanilla extract .
It really enhances that sweet and cozy autumn vibe.
For a twist, don't shy away from adding more spice; nutmeg complements toppings like whipped cream or vanilla ice cream beautifully. Play with combinations—this is where your personal taste shines through.
Smart Substitutions
We’ve all been there: your favorite ingredient is suddenly missing. No worries! Here are some smart substitutions that’ll save the day.
-
Butter: If you’re out of butter, coconut oil can step in. Use the same amount, and you’ll get a unique flavor.
-
Fruit: Running low on apples? Peaches work too! Or even sliced pears alone make a delightful galette.
-
Egg Wash: Forget the egg? Brush with a little milk for a similar sheen.
Kitchen Equipment Essentials
Finally, let's sort out the kitchen gear. You’ll want some must-have tools in your arsenal for that perfect easy galette recipe :
-
Food processor – to whip up that crust in no time.
-
Rolling pin – essential for getting that flaky pastry to a perfect 12-inch circle.
-
Parchment paper – because no one wants a sticky galette disaster.
Now, don’t sweat it if you don’t have a fancy food processor. a good old mixing bowl and your hands work just fine.
Just remember to keep it cool when working with butter!
So there you have it! you’re armed with all the essentials for baking a rustic tart that’ll be the star of any gathering.
Now, let’s transition into the juicy part: how to put it all together in stunning style to create that comforting apple apple pear galette.
Get ready for your kitchen to smell like autumn in no time!
Mastering the Professional Cooking Method: Steps to Success in Your Kitchen
So, you wanna level up your cooking game and impress your friends, right? well, let’s break it down with some pro techniques and knowledge you need to nail that apple apple pear galette or any rustic fruit tart you dream of! spoiler alert: it’s easier than you think.
Essential Preparation Steps
Before diving into the recipe, let’s cover some essential groundwork. you’ve probably heard of mise en place —it’s just a fancy french term for having everything ready before you start cooking.
I can't tell you how many times i’ve sliced and diced only to find i’m missing an ingredient. trust me, prep is key!
Next up is time management . set a timer—that’s my secret weapon! whether you're chilling dough or baking, keeping track of time ensures things turn out just right.
Don’t forget about organization . a clean workspace leads to a clear mind. gather everything before you dive in—your ingredients, tools, and that all-important turbinado sugar for sprinkling on top of your galette later!
And now, let’s talk safety. Always keep those knives sharp and store your hot pans properly. A small cut can ruin your cooking vibe!
Step-by-Step Process
Now onto the fun part: cooking! Here’s a clear, numbered guide.
-
Make the Crust:
- Blend 1 ½ cups of flour and a pinch of salt in a food processor.
- Add ½ cup of chilled butter , pulsing until crumbly.
- Drizzle in 5-6 tablespoons of cold water . Keep pulsing till it sticks together.
- Form it into a disk, wrap it up, and let it chill in the fridge for a 30-minute break . No peeking!
-
Prep the Filling:
- Grab 2 apples and 2 pears . Peel, core, and slice them thin.
- Toss them in a bowl with ⅓ cup of brown sugar , a dash of cinnamon , and 1 tablespoon of lemon juice . This combo is a game changer!
- Let those flavors mingle while you roll out your dough.
-
Assembly Time:
- Preheat your oven to 375° F (that’s around 190° C for my metric friends).
- Roll out your chilled dough to a 12-inch circle on a lightly floured surface.
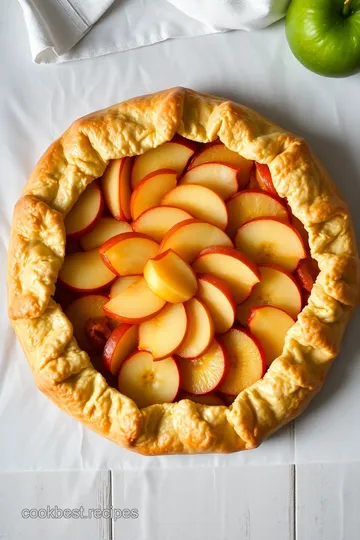
- Move this beauty onto a parchment-lined baking sheet. Spoon in that fruit filling, leaving a nice 2-inch border around it.
- Fold the edges over the fruit, making it look rustic (and trust me, no one needs a perfect look when it's delicious).
- Brush with an egg wash and sprinkle with turbinado sugar .
-
Bake It Up:
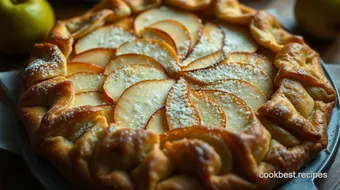
- Bake your galette for 35- 40 minutes until golden brown and bubbly. Enjoy the aroma wafting through your kitchen—it’s pure bliss!
Expert Techniques
All right, so you made it this far! to really elevate your game, focus on some professional methods . keeping your ingredients chilled is crucial for a flaky pastry crust, which is the highlight of any galette.
And please don’t overwork that dough—tenderness is the key here!
While baking, use your senses. check for visual cues; if the crust is golden brown and the fruit is bubbling, you’re on the right track! and hey, if you think your fruit galette looks a bit too bubbly before times up, that’s a good sign you nailed the baking.
Success Strategies
Now, let’s talk about what can go wrong—because, let’s be real, it happens. one common pitfall is undercooking the crust.
If it feels doughy, give it a little more time—keep your oven at that set 375° f .
Also, aim for a balance of flavors. if your fruit is too tart, add a bit more sugar. and if you want to prep ahead, you can always make that homemade pie crust a day before.
Just keep it tightly wrapped in the fridge.
Finally, remember that the best autumn dessert ideas are the ones you share with friends, so serve that galette warm, and maybe offer some vanilla ice cream on the side.
Additional Information
And there you have it! from prepping like a pro to mastering that cozy, rustic fruit galette, you’re ready to rock any kitchen.
This apple apple pear galette isn’t just about the food, but the experience of making it. so get in there, and enjoy your time cooking with seasonal produce—it doesn’t get better than that!

Pro Tips & Secrets for Your Apple Apple Pear Galette
Oh, you’re gonna love this! making an apple apple pear galette is like a warm hug on a chilly day.
Here are some pro tips that i’ve picked up over my years of baking. you’ll impress your friends and family while saving time and effort.
Chef's Personal Insights
First off, i swear by using a food processor for the crust. it’s a total game changer! just pulse the flour, sugar, and cold butter together until it looks like crumbly sand.
It’s seriously easier than trying to mix it by hand. oh, and keep that butter cold—like, straight from the fridge cold.
Flaky crust? yes, please!
Time-Saving Techniques
Need to cut down on prep time? try slicing your apples and pears the night before. just toss them in a little lemon juice to keep them from browning.
You'll wake up with the sweetest surprise waiting in your fridge. who doesn’t love a shortcut?
Flavor Enhancement Tips
Sometimes, you just gotta think outside the box. while cinnamon is a classic here, adding a pinch of nutmeg or even a splash of vanilla extract can elevate your rustic tart to another level.
Trust me, your taste buds will thank you!
Presentation Advice
Let’s be real: we eat with our eyes first. for that instagram-worthy look, roll the dough out evenly and leave some of those lovely sliced apples and pears peeking out.
Brush the crust with an egg wash and sprinkle on some turbinado sugar for that golden-brown sparkle. your galette will be a showstopper!
Perfect Presentation of Your Galette
Now, let’s talk about making that apple pearl dessert shine like a star.
Plating Techniques
A cool trick i learned is to cut the galette into wedges, just like you would with a pie, but don’t worry about being perfect.
The more rustic it looks, the better! place a slice on a beautiful plate, and let it stand out.
Garnish Ideas
A sprinkle of powdered sugar or a few mint leaves on the side adds a splash of color and freshness.
If you’re feeling fancy, drizzle some caramel sauce over the top right before serving. wow, just wow!
Color Combinations
The contrast of those deep reddish apples and pale pear flesh is beautiful. Think about the colors on your plate—complimentary hues make everything more appetizing.
Visual Appeal Tips
Always serve it warm. there's something about a steaming galette that makes the whole kitchen smell divine. plus, warm fruit is just the best, right? you could even plop a scoop of vanilla ice cream right next to it.
Double whammy!
Storage & Make-Ahead
Here’s the scoop on keeping your galette fresh and tasty.
Storage Guidelines
Wrap leftover slices gently in plastic wrap or store them in an airtight container. They should hold up well in the fridge for about three days—if they last that long!
Preservation Methods
If you want to keep it longer, freeze it before baking. just wrap it tightly and store it in the freezer for up to a month.
When ready to bake, just pop it in the oven without thawing, adding a few extra minutes to the cooking time.
Reheating Instructions
For reheating, toss it in a preheated oven at 350° F for about 10- 15 minutes. This way, you’ll get that crust crispy again. No one wants a soggy galette!
Freshness Duration
Honestly, it’s best on day one, but day two still tastes great. After that, the crust can get a bit softer.
Creative Variations
Feeling adventurous? Here are some fun spins on this classic galette!
Flavor Adaptations
How about a cinnamon apple pear galette with some ginger thrown in for spice? Toss in a handful of cranberries for that pop of tartness!
Dietary Modifications
Need a gluten-free fix? Swap the all-purpose flour for your favorite gluten-free blend. It’s surprisingly easy, and no one will know the difference!
Seasonal Twists
During summer, throw in some peaches or plums instead of pears. Every season brings its own delicious fruits to experiment with. Let your creativity shine!
Regional Variations
A little twist I love is adding some almond extract instead of vanilla for an Almond Pear Galette inspired by French touch. That buttery crust paired with almonds is pure comfort food.
Complete Nutrition Guide
Eating delicious food doesn’t mean we can’t focus on nutrition!
Detailed Breakdown
This rustic baking gem serves up about 250 calories per slice. Not too shabby!
Health Benefits
With apples and pears packed with fiber, you’re getting a dose of healthy goodness along with your dessert. Plus, who can resist that comforting taste?
Dietary Considerations
For those keeping track, this galette has a moderate amount of sugar and fat. Enjoy it in moderation!
Portion Guidance
Feel free to indulge in a slice or two. Sharing is caring, especially when it comes to comfort food like this.
Expert FAQ Solutions
Got questions? I’ve got answers!
Common Questions
“Can I use other fruits?” Absolutely! Use whatever seasonal produce you have on hand.
Troubleshooting Guide
If your crust is tough, you may have overworked the dough. Absolutely no elbow grease needed—stay gentle!
Success Tips
For a great crust every time, be patient while chilling the dough. Those little breaks make a world of difference.
Variations Explained
Never hesitate to experiment! Changing one ingredient can turn the whole dish into something new and totally epic.
So, there you have it! armed with these tips and tricks, you’re ready to create your very own apple apple pear galette masterpiece.
Bake it, share it, and most importantly, enjoy every glorious bite. don’t be shy; show off that galette and let it shine! happy baking, friend!
Apple Apple Pear Galette Card
⚖️ Ingredients:
- 1 ½ cups all-purpose flour
- 1 tablespoon granulated sugar
- ½ teaspoon salt
- ½ cup unsalted butter, cold and cubed
- 5-6 tablespoons cold water
- 2 medium apples, peeled, cored, and thinly sliced
- 2 medium pears, peeled, cored, and thinly sliced
- ⅓ cup brown sugar
- 1 tablespoon cornstarch
- 1 teaspoon ground cinnamon
- 1 teaspoon vanilla extract
- 1 tablespoon lemon juice
- 1 egg, beaten (for egg wash)
- Turbinado sugar, for sprinkling (optional)
🥄 Instructions:
- Step 1: Combine flour, sugar, and salt in a food processor.
- Step 2: Add butter and pulse until mixture resembles coarse crumbs.
- Step 3: Gradually add cold water, pulsing until dough comes together.
- Step 4: Shape the dough into a disk, wrap in plastic, and refrigerate for at least 30 minutes.
- Step 5: In a large bowl, combine sliced apples and pears.
- Step 6: Add brown sugar, cornstarch, cinnamon, vanilla extract, and lemon juice.
- Step 7: Toss gently to coat the fruit evenly.
- Step 8: Preheat the oven to 375°F (190°C).
- Step 9: On a lightly floured surface, roll out the dough into a 12-inch circle.
- Step 10: Transfer rolled dough onto parchment-lined baking sheet.
- Step 11: Arrange fruit mixture in the center of the dough, leaving a 2-inch border.
- Step 12: Fold the edges over the fruit, pleating as necessary.
- Step 13: Brush edges with beaten egg and sprinkle with turbinado sugar, if desired.
- Step 14: Bake for 35-40 minutes, or until the crust is golden brown and the fruit is bubbling.
- Step 15: Let cool slightly before slicing.
Previous Recipe: How to Enjoy Hot Banana Pepper Plant: 5 Delicious Stuffed Ideas!
Next Recipe: Delicious Almond Green Pesto Pasta: The Ultimate Quick Dinner!